
Installation Guide


R H
•••••••••••••••••••••••••••••••••••••••••
INSTALLATION INSTRUCTIONS
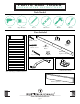
PARTS AND TOOLS
www.rusticahardware.com
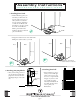
5. Attaching Track
• e outside holes will be installed with a Track Stop.
• In this order: Adjustable Spacer, Flat Track, Track Stop, 1”
Washer, and Lag Screw. Using a ratchet with a 9/16”
socket, tighten the Lag Screw most of the way, enough to
hold the Track in place, but allowing the Track to move.
• Swing the Track up to be horizontal, and repeat the same
step on the opposite end of the Track (see Step 4, above).
• e hardware for the middle holes will be installed in this order:
Adjustable Spacer, Flat Track, 1” Washer, and Lag Screw.
Using a ratchet with a 9/16” socket, tighten the Lag Screw
most of the way.
• Repeat on all remaining middle Track holes.
• After all Lag Screws are in, fully tighten all using your
ratchet with socket, being careful not to over-tighten to
avoid stripping the wall studs or the header.
9/16”
6. Hole Installation
• Using Lag Screws, loosely install one end of your Track
per instructions in Step 6, below. Swing the Track up,
making sure it is level, then install the other end.
• Install all remaining holes and tighten.
9/16”
Assembly Instructions
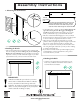
4. Marking Drill Holes
• Center the Flat Track over the line you have made
to mark Track location.
• Position the Door Stop over
the Flat Track and once
you have determined
how far from the
Track end you
want your Door
Stop, pencil a mark
in the center of
the hole on your
Door Stop. Repeat
on the other Track End
after checking to see the
Track is horizontally level.
Make sure you position the edge of the Door Stop slightly
past the edge of your Door to ensure the closed Door will
cover the doorway and overlap the wall slightly.
Door Opening
Door Stop
Edge of Door
goes slightly
past the Door
opening
Door
Stop
Door
opening
page 4