
Installation Guide


Installing the Industrial Hardware System
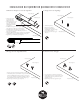
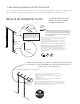
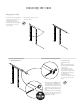
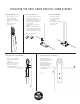
1. Installing Your Hanger Assembly To Your Door 2. Tightening Your Hanger Assembly
5/8”
read the Hex Bolts with the
Washers through the back of
the Door.
Thread the Hanger assembly
through the Hex Bolts on the
front of the Door.
Holding Hex Bolts in place
using a ratchet with a 5/8”
socket, lightly tighten your
Acorn Nuts by hand.
Hex Bolt
1” Washer Acorn Nut
Using a 9/16” wrench for the
Acorn Nut and a ratchet with a
5/8” socket and for the Hex Bolt,
gently tighten, being careful not
to damage your Hanger or Acorn
Nuts.
Repeat Steps 1 and 2 on the
opposite edge of the Door.
5/8”
9/16”
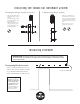
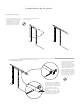
Once you have penciled a line onto your
wall for where your track will be installed
(as per Track Installation Instructions),
locate and mark where the wall studs are.
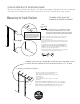
Determining Header Location
PLEASE NOTE: We strongly advise you to have someone help you install your Header.
We recommend your Header be 4” longer than your Track (Header would extend 2” past
Track on both ends).
Studs are marked
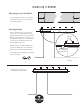
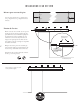
When installing your
Track, be sure you are
drilling into wall studs
or into a Header that
is installed through the
wall studs. This will
provide the stability your
wall needs to hold the
weight of your Door.
Installing a Header