
Installation Guide

R H
•••••••••••••••••••••••••••••••••••••••••
INSTALLATION INSTRUCTIONS
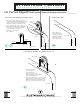
ATTACHING HANGER
2”
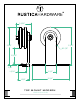
• Place your Top Mount Hanger up against the top
of your Door, making sure the Hanger front and the
Door front are both facing the same direction.
Measure 2” from the edge of your Door to the arm
portion of the Hanger. (also, see below).
• With a pencil, mark the center of both Hanger
holes (these indicate where you should drill to
attach your Hanger to your Door).
• Repeat Step 1 on the opposite
edge of the Door.
1. Measuring And Marking Your Hanger Holes
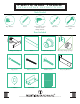
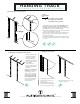
• Using a drill with a
1/8” bit, drill two pilot
holes (one pilot hole for
each hole in the Hanger).
• Repeat Step 2 on the
opposite edge of the Door.
2. Drilling Pilot Holes
1/8”
Door Top
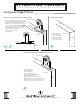
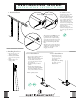
3. Installing Your Hanger Assembly To Your Door
Door Back
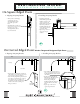
On Square-Edged Doors
Door
Edge
Door Edge
Door Top
Door Back
Door Top
Door
Edge
Door Back
Back of Hanger
Door Top
Door Edge
Door Front
• Place the Hanger back
onto the top of your
Door, with the holes
centered over the pilot holes.
Make sure your Hanger and your Door
are both facing the same way.
• Place a Fastener Screw tip into a pilot hole.
Drill the Fastener Screw down into your door using
a Phillips bit. Repeat for the other Fastener Screw.
• Repeat Step 3 on the opposite edge of the Door.
Back of Hanger
2”
2”