
Installation Guide

R H
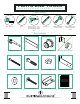
•••••••••••••••••••••••••••••••••••••••••
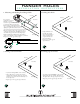
INSTALLATION INSTRUCTIONS
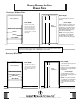
INSTALLING GUIDE
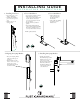
2. Door Guide Part 1 3. Door Guide Part 2
• Use your level to plumb* your Door.
• With the Door in the closed
position, place the Door Guide half
way into the Door mortise (the
groove that runs along the bottom
of a wood Door).
• Double check that your Door is
plumb.*
• Hold the Door Guide firmly in
position. Using a drill with a Phillips
bit, install a 1” Grabber Screw to
secure your Door Guide to the floor.
_____________________
*Plumb - perfectly vertical.
• Slide the Door into the
open position exposing
the other edge of the
Door Guide.
• Using a drill with a Phillips
bit, install a second 1”
Grabber Screw.
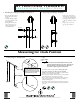
1. Installing Your Door
4. Aligning Anti-jump Bracket
• Lift your Door up to your
Track at a slight angle.
• Carefully rest both Wheel
grooves onto the top of the
track.
• Guide the Door to the
resting position.
• Place your Anti-jump Bracket
against the outside edge of
your Door.
• Slide the Bracket up until
there is a 1/16” to 1/8” space
between the top of the
Anti-jump Bracket and the
bottom of the Track.
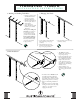
5. Installing Anti-jump Bracket
• Holding the Anti-jump
Bracket rmly in place, drill
Grabber Screws into each
of the two holes in the
Bracket until screw heads are
ush with your Bracket.
Installing this Bracket will
ensure your Door will not
come o its Track.