
Installation Guide

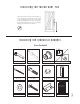

Installing the Industrial Hangers
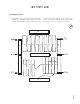
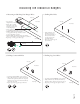
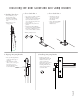
1. Installing Your Hanger Assembly To Your Door 2. Tightening Your Hanger Assembly
5/8”
• read the Hex Bolts with the
Washers through the back of
the Door.
• Thread the Hanger assembly
through the Hex Bolts on the
front of the Door.
• Holding Hex Bolts in place
using a ratchet with a 5/8”
socket, lightly tighten your
Acorn Nuts by hand.
Hex Bolt
1” Washer
Acorn Nut
• Using a 9/16” wrench for the
Acorn Nut and a ratchet with a
5/8” socket and for the Hex Bolt,
gently tighten, being careful not
to damage your Hanger or Acorn
Nuts.
• Repeat Steps 1 and 2 on the
opposite edge of the Door.
5/8”
9/16”
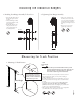
Measuring for Track Position
}
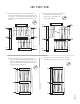
• Check to see if your floor is level. If your floor rises more than 1/2”
along the length of the Track, you risk your Door rubbing or
sticking at this high point.
• If your floor is not level, measure up from the highest point of your
floor to find your Track hole center position to attach the Track to
your wall.
• To determine where to install your Track, add together 1-5/8”
(space above door) plus 1/2” (oor gap) to the height of
your Door. This measurement is how high up on your wall (from
your floor up) you should install the Track.
• This is where you will mark a horizontal line on your wall parallel
to the finished floor, the same length of your Track.
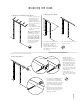
1. Measuring for Track Position
}
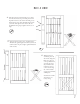
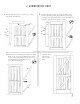
Door Height
1/2”
1-5/8”
1-5/8”
Door Height
1/2”
+
+
=
This 1-5/8” measurement
ensures coverage of your door-
way and makes it so your Track
assembly will not be visible from
the other side of your Door.
# of inches up from nished oor where you will
pencil a horizontal line for your Track. This line will
mark the center of the Track and your penciled
line will be visible trough the Track holes.
Page 11