
User manual
5
NOTE: Do not slam the top housing down as it may cause the mixture to run off the
cooking plates.
NOTE: For a thinner cone, evenly press down on the cover latch when top housing is
closed.
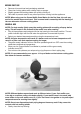
• Allow to cook for approximately 2 minutes or until golden.
• To remove wafe cone, always use a plastic or wooden spatula or tongs.
NOTE: Never use a sharp object or metal, as this will damage the non-stick surface of
cooking plates.
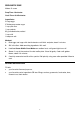
• Gently roll the at wafe cone around the plastic cone roller and hold into place for a few
seconds to set.
NOTE: The waffle cone will be hot to handle, use paper towel or plastic tongs to assist in
rolling waffle cone.
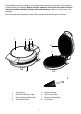
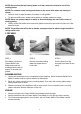
3 STEP GUIDE
CLEANING AND CARE
1. Unplug unit and allow to cool completely before cleaning. Never immerse Wafe Cone
Maker in water or other liquid or wash in a dishwasher.
2. Brush any loose crumbs from the cooking plates. Then wipe the cooking plates with a
damp paper towel or cloth.
3. Wipe the housing of the appliance with a damp cloth. Do not use steel wool, scouring
pads or abrasive kitchen cleaners on the unit.
STORAGE
• Always unplug the Ice Cream Wafe Cone Maker before storage.
• Always make sure the Ice Cream Wafe Cone Maker is cool and dry before storing.
• To minimize storage space in your kitchen, the Ice Cream Wafe Cone Maker can be
stored vertically.
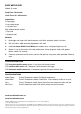
STEP 1
Pour batter into the Ice
Cream Waffle Cone
Maker and close top
housing and let cook for
approx. 2 minutes until
golden.
STEP 2
Remove from the cooking
plate and shape around
cone roller.
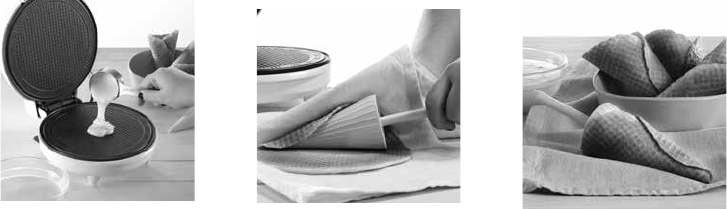
STEP 3
Hold in place for a few
seconds to set then fill and
enjoy!