Table Top Fridge Instruction Manual Model number(s): RHTTLDR2 (B) (SS) (GB) For Customer Services & Spare Parts please call 0345 208 8750 or visit us at mda.russellhobbs.
Contents Safety Instructions ………………………………………. 3-5 Electrical Safety ………………………………………. 5 Transportation & Handling ………………………………………. 5 Installing & Switch on your Appliance ………………………………………. 6-7 Before Switching On ………………………………………. 7 Product Overview ………………………………………. 8 Unit & Spare Parts ………………………………………. 8 Usage ………………………………………. 9 Temperature Selection ………………………………………. 9 Door Reversal ………………………………………. 10-12 Energy Saving Advice ……………………………………….
Safety Instructions Important note: Please read this booklet before installing and switching on this appliance. The manufacturer assumes no responsibility for incorrect installation and usage as described in this booklet. Warning: When positioning the appliance, ensure the supply cord is not trapped or damaged. Warning: Do not locate multiple portable socket-outlets or portable power suppliers at the rear of the appliance. • This model uses natural refrigerant gas as part of its cooling system.
• Do not plug in damaged plugs. • Do not pull, twist or damage the power cable. • Do not plug-in or un-plug the appliance with wet hands to prevent electrical shock. • This appliance can be used by children aged from 8 years and above and persons with reduced physical, sensory or mental capabilities or lack of experience and knowledge if they have been given supervision or instruction concerning use of the appliance in a safe way and understand the hazards involved.
• One-, two- and three -star compartments (if they are presented in the appliance) are not suitable for the freezing of fresh food. • If the appliance is left empty for long periods, switch off, defrost, clean, dry and leave the door open to prevent mount developing within the appliance. • Remove doors lids of refrigeration appliances before disposal to ensure safety of children or animals from becoming trapped.
Installing and Switching on Your Appliance • Operating voltage for your appliance is 220-240V at 50Hz. • Before plugging in the power supply, ensure that the voltage on the rating label corresponds to the working voltage of your electrical system in your home. • Insert the plug into an efficient Ground (Earth) connection. If the socket has no Ground (Earth) contact or the plug does not match, we suggest you call an authorised electrician for assistance.
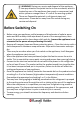
WARNING! During use, service and disposal of the appliance, please pay attention to symbol similar to the one shown, which is located on rear of the appliance (rear panel or compressor) and with a yellow or orange colour. It’s risk of fire warning symbol. There are flammable materials in refrigerant pipes and compressor. Please be far away from fire source during use, service and disposal.
Product Overview 1 2 8 3 7 4 12 9 6 5 10 11 13 1. 2. 3. 4. 5. 6. 7. Evaporator Drainage hole Wire shelf Bottle shelf/floor Adjustable feet Bottle rack/door shelf Door shelf 8. 9. 10. 11. 12. 13. Metal back Thermostat Plug Compressor Drip tray Cleaning rod Unit Parts & Spare Parts Before installation, check that all parts detailed in the product overview are present. If any parts are missing, please contact the Customer Service team on 0345 208 8750 or visit us at mda.russellhobbs.
Usage Allow to stand for a minimum of 3 hours before plugging in to the mains The temperature in the appliance is controlled by the temperature control knob located inside the fridge. Rotate the control knob left or right to regulate the temperature inside the fridge. On the temperature control, 0 is OFF, 1 is the warmest setting and 5 is the coldest setting.
Door Reversal You will need to tilt the fridge backward to access the lower hinge which holds screws. Do not tilt more than 45 degrees and do not lay the fridge flat on its side. Tools Required: Philip head screwdriver, flat headed screwdriver and hexagonal spanner. 1. Remove the top plastic hinge cover and set aside, then unscrew the three screws from the metal bracket and set aside. Remove the door and place on a cushioned surface. 2.
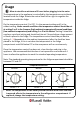
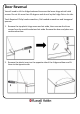
Door Reversal 3. Remove the small screw at the bottom of the fridge that is on the opposite side of the bottom hinge. Also remove the adjustable feet and set aside. 4. Unscrew the two screws holding the bottom door hinge and remove it from the appliance. Then remove the pin and washer from the hinge (use a spanner to remove the washer). Flip over the hinge bracket and reinsert the washer and pin (please see the image below). 5. Moving the lower hinge across to the opposite side and fix into position.
Door Reversal 6. Position the door in the correct position at the top and put the pin of the upper hinge in to the top of door and then install the top hinge on the left hand side and fix it in place with 3 screws. Put the hinge cover on the upper hinge. Ensure the door is aligned horizontally and vertically so that the seals are closed on all sides before finally tightening the top hinge. Check that the door opens and shuts correctly after you have completed the door reversal process.
Energy Saving Advice • Do not install the appliance close to sources of heat, such as a cooker, dishwasher or radiator. • Locate the appliance in a cool well-ventilated room and make sure that the air vents are clear. • Try to avoid keeping the doors open for a long time, warm air will enter the cabinet and may cause a build-up of ice as well as affecting the energy consumption. Ensure there are no obstructions preventing the doors from closing properly.
Maintenance & Cleaning Disconnect the appliance from the power supply before cleaning. Internal Cleaning • Do not pour water over the appliance. • The cavity should be cleaned periodically using a solution of bicarbonate of soda and lukewarm water (5ml to 0.5 litre of water) • Clean the accessories separately with soap and water. Do not put them in the dishwasher. • Do not use abrasive products, detergents or soaps. • After washing, rinse with clean water and dry carefully.
Trouble shooting Problem Solution Check that the appliance is switched on. Check that there has not been a power cut. Check that the plug is not faulty. The fridge doesn't work Check that the fuse has not blown. Check that the voltage is correct for the appliance. Are there any faults with the socket? For this purpose, try the plug of your appliance by connecting it to a socket which you are sure is working. Check that there is not too much food in the appliance.
Trouble shooting Problem Solution Check all the food and drink that is in the fridge is in date and correctly packaged. If it isn’t then it should be removed immediately or repackaged. Smell/odour Check for spillages on each shelf, rack and drawer. You may need to remove the drawers to check that no spillages have settle underneath them. As spillages that have not been cleaned and have been left can cause smells and unwanted odours. Ensure there are no obstructions preventing door closure.
Connection to the Mains Supply WARNING- THIS APPLIANCE MUST BE EARTHED This appliance is designed to operate from a mains supply of AC220V - 240V; 50HZ. Check that the voltage marked on the product corresponds with your supply voltage.
Guarantee This product is guaranteed for 12 months from the date of the original purchase. If any defect arises due to faulty materials or workmanship you must contact Product Care with the original proof of purchase so a replacement or refund can be arranged. Refund or replacement is at the discretion of Product Care. The following conditions apply: • Product Care will require a valid proof of purchase at the point of replacement or refund.
Technical Specification Model number RHTTLDR2 (B) (SS) (GB) (-LCK) Rated Voltage 220V – 240V ~ 50Hz Capacity 40L External Dimensions(HxWxD) 510mm x 440mm x 470mm 19
Product Fiche Model RHTTLDR2/B/SS/GB Fresh Food Storage Compartment Volume (L) 40 Frozen Food Storage Volume (L) N/A Storage Temperature (°C) 0 to 8 Energy Consumption (kWh/per year) 99 Energy Consumption (kWh/per year), based on standard test results for 24 hours Energy Rating F Defrosting Type Static Climate Class N/ST This appliance is intended to be used at an ambient temperature between 16°c and 38°c Airbourne Acoustical Noise (dB) 39 Temperature Rise Time N/A Freezing Capacity N/A
Notes 21
Notes 22
Notes 23
Russell Hobbs is a registered trademark used under license from Spectrum Brands (UK) Ltd. Made under license by Made by Product Care Trading Limited, Wigan, WN2 4AY/ PCT (NI) Ltd, Belfast, BT5 5AD Russell Hobbs Support: call 0345 208 8750 or visit: mda.russellhobbs.com The ‘wheelie bin’ symbol is known as the 'Crossed-out wheelie bin Symbol'. When this symbol is marked on a product/batteries, it means that the product/batteries should not be disposed of with your general household waste.