
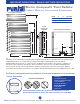
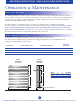
Install Instructions
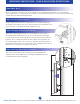


step 4 DRill holes:
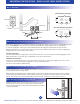
step 5 fasten the Wall BRackets:
step 6 assemBle the omnipanel ii BRackets:
step 7 hang the ominipanel ii on the Wall:
Runtal noRth ameRica, inc. US Tel: 800-526-2621 s Canadian Tel: 888-829- 4901 s www.runtalnorthamerica.com
3
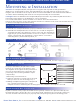
IMPORTANT INSTRUCTIONS READ & SAVE THESE INSTRUCTIONS
Be sure to drill the mounting holes in the middle of the mounting brackets marks. Use of metal wall
anchors will require
5
/
16” holes while use of #8 x 1
1
/
2“ long screws will require
1
/
16” holes. Runtal recommends
solid blocking for wall mounting brackets.
Using the appropriate fastener, attach the four “L“ brackets (part C) to
the wall. Be sure that the grooves in these brackets are facing down. Once
positioned, the “L” brackets should be tightly secured.
Once the hex screw and nut are loosely positioned, simply slide the
OmnipanelII onto the wall brackets, and temporarily tighten the hex
screws with the hex wrench (part E).
Slip a grooved nut (part G) inside one of the brackets on the back of
the OmnipanelII (making sure the grooves on the nut are facing up).
Loosely screw the hex screw (part F) into this nut, and repeat on all four
brackets. Then on all models, slide the four plastic sleeves (part D) over
the OmnipanelII brackets. Use of sleeves is optional, but they provide a
finished, flush appearance on uneven walls. If the installation has a good,
flat surface, use of the sleeves may not be desired.
Floor
Part
C
Part
F
Part
E
Part
G
Part
D