
User Guide


STEP 6 FASTEN THE BRACKET SLEEVES TO THE WALL
Using the proper fasteners (either the metal anchors or #8 screws)
attach the mounting sleeves (Part D) to the wall. Fasten the sleeves
with the set scr
ew on the top for sleeves at the top of the radiator
and set screw on bottom for sleeves at bottom of radiator.
STEP 5 DRILL HOLES
Drill holes for appropriate anchors in the middle of all four traced
circles. Use of the metal wall anchors will requir
e a 5/16
"
hole; use
of the 1-1/2
"
scr
ew will require a 1/16" pilot hole.
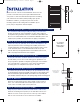
Set Screw on top for
mounting post at
top of radiator
Set Screw on bottom
for mounting post at
bottom of r
adiator
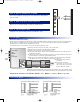
STEP 2 ATTACH THE FOUR POSTS TO THE RADIATOR
STEP 3 POSITION THE RADIATOR ON THE WALL
STEP 4 DETERMINE WALL CONSTRUCTION
II
N
N
S
S
T
T
A
A
L
L
L
L
A
A
T
T
I
I
O
O
N
N
Position the four posts, parts A, B, & C as shown in the diagram on the
right. The placement of the mounting posts is flexible, however it is
recommended where possible that the posts be placed near the corners
of the unit between the second and third tubes from the top and
bottom. All four posts supplied with the towel radiator must be used,
half as top supports and half as bottom supports.
To hang the unit either: (1) Ask an assistant to hold the unit against
the wall while you trace the four mounting posts. (2) Measure out
the post positions. (3) Make a template by placing the towel radiator
onto a posterboard or a large piece of the carton and tracing the
mounting posts. The template is then taped to the wall.
For solid wood or placement into blocking use the provided #8 x 1-1/2" long
screw with washers, (part F). For drywall construction use the included metal
anchors with washers, (part G). Runtal towel radiators are ver
y stur
dy and
care should be taken that they are securely hung using all four mounting posts.
Use Cardboard
from Radiator
Packing Carton to
make Template
Pl
ease check the contents of the Runtal Fain carton to be sure
you have received all of the parts required. Runtal has made
e
very effort to ensure that all materials required for mounting
your unit have been included, and depending upon specific
installation conditions, you may have parts left over. The
mounting system has been designed for installation by one
person, but you may find an assistant helpful.
ST
EP
1 DE
TERMINE
WI
RING OR
PI
PING
(IF OTHER THAN A PLUG-IN MODEL)
The electrician should start by providing the wiring to the Fain if the
model is electrical. The easiest termination of wires at the radiator is
accomplished using stranded conductors or 14/2 Romex (#12 AWG solid
wire is not recommended because of termination difficulties). If the unit
is hydr
onic, the plumber should determine the piping configuration.
Fain Installation Sheet.Q6 6/14/07 8:24 AM Page 2