
Specifications


80
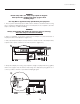
5. Align the new lamp with the top and bottom guides on the left side of the lamp
compartment. (Figure 4.5.) Slide the lamp all the way in – a slightly harder push may be
required right at the end to make sure it is fully seated into the terminal block. NOTE: The
projector will not power up again if the lamp is not fully connected to the terminal block.
6. Pull (out) and turn the lamp lock lever (turned up in Step 3) a quarter turn clockwise to
“lock” the lamp in place. NOTE: If you can’t turn the lamp lock into position it is likely the
lamp is not fully inserted. In this case, partially remove the lamp and try pushing it back in
again. Then, try switching the lock lever to the “lock” position.
7. Replace the lamp door and tighten the 2 screws to secure.
8. The next time the projector is powered up, enter the new serial number of the newly
installed lamp. Access the Lamp menu and select “Change Lamp”.
Enter the serial number in the Lamp S/N text box using the number text entry keys.
Figure 4.4
Figure 4.5
Section 4: Maintenance