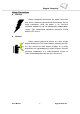
Rugged Computing I980 Rugged Tablet PC ® (Intel Atom Z530 Based Tablet PC) USERS MANUAL Version: 1.2 R08I98M-RTXXXX 8.4 inch Rugged Tablet PC R10 I98M-RTXXXX 10.4 inch Rugged Tablet PC R12 I98M-RTXXXX 12.
Rugged Computing IMPORTANT SAFETY INSTRUCTIONS Please read these instructions carefully before using the product and save for later reference. Follow all warnings and instructions marked on the product. Unplug this product from the wall outlet before cleaning. Clean the product with a damp soft cloth. Do not use liquid or aerosol cleaners as it may cause permanently damage to the screen. Do not use this product near the water. Do not place this product on an unstable cart, stand, or table.
Rugged Computing Copyright Notice Copyright © 2009 Winmate Communication Inc., ALL RIGHTS RESERVED. No part of this document may be reproduced, copied, translated, or transmitted in any form or by any means, electronic or mechanical, for any purpose, without the prior written permission of the original manufacturer. Trademark Acknowledgement Brand and product names are trademarks or registered trademarks of their respective owners. Disclaimer Winmate Communication Inc.
Rugged Computing Customer Service We provide service guide for any problem as follow steps:First, visit the website at http://www.winmate.com.tw to find the update information about the product. Second, contact with your distributor, sales representative, or our customer service center for technical support if you need additional assistance. You may have the following information ready before you call: Product serial number Peripheral attachments Software (OS, version, application software, etc.
Rugged Computing Safety Precautions Warning! Always completely disconnect the power cord from your chassis whenever you work with the hardware. Do not make connections while the power is on. Sensitive electronic components can be damaged by sudden power surges. Only experienced electronics personnel should open the PC chassis. Caution! Always ground yourself to remove any static charge before touching the CPU card. Modern electronic devices are very sensitive to static electric charges.
Rugged Computing Packaging List This product is shipped with the items list below. Please make sure that all are in your package. Default Packing Accessories Item Description Note 1 1 piece of 6 Cell Li-Ion Battery Pack 2 1 piece of Users Manual. 3 1 piece of CD for System Driver Utility. 4 1 piece of 19V Adapter w/ Standard Power Cord. (Euro / U.S. Std type, 1.
Rugged Computing Contents IMPORTANT SAFETY INSTRUCTIONS ................................................................ 2 PACKAGING LIST ................................................................................................. 6 CHAPTER 1 GETTING STARTED ....................................................................... 10 1.1 CONNECTING THE AC POWER.................................................................................................................. 10 1.
Rugged Computing CHAPTER 5 TIPS TO TAKE CARE OF YOUR TABLET PC............................. 66 5.1 GENERAL PROTECTION TIPS FOR TABLET PC .......................................................................................... 66 5.2 CLEANING THE TABLET PC...................................................................................................................... 66 5.3 BATTERY PROTECTION TIPS .......................................................................................................
Rugged Computing CHAPTER 1 Getting Started Users Manual 9 Rugged Tablet PCs
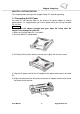
Rugged Computing CHAPTER 1 GETTING STARTED This chapter guides you to get the Rugged Tablet PC ready for operating. 1.1 Connecting the AC Power Our tablet PC can operate either on the external AC power adapter or internal battery power. It is suggested that you use AC power when you start up the tablet PC first time. **Caution Use only the AC adapter included with your tablet PC. Using other AC adapters may damage the tablet PC. 1. Make sure that the tablet PC is turned off. 2.
Rugged Computing 6. Turn on the Tablet PC few seconds later after power is being supplied from the electrical outlet to the AC adapter. 7. When the AC adapter is connected, the Battery Pack is also under charging. You can check the Battery Status LED indicator to see the currently progress. The indicator turns to green when is fully charged.
Rugged Computing 1.3 The Optimized Use for Sunlight Readable Touchscreen. With the imposed reflective function, the modified LCD can reflect the ambient light passing the LCD cell and utilize the reflected light beams as its illumination. The stronger the ambient light is, the brighter the LCD will appear. As a result, the modified LCD is viewable under lighting conditions. The optimized angle of view is fourty-five degree. And the optimized distance of view is 30 cm.
Rugged Computing 1.4 8.4 inch I/O Functions (MOQ required) This section we will show the Tablet PC external connection parts and their functions. LED Indicator Status Description LED Term LED Indicator Indicator Status Description Green light:when Power is On. Power mode No light means when Power is Off. Orange Light: Under charging Red Blinking Light:Low Battery Battery Status (Check Chapter 2.2.
Rugged Computing # Components Function Description See Other Intro. A. PCIExpress One PCIExpress slot for user to connect any PCIExpress 34 standard interface device. B. SDIO One SD Card slot for user to connect any SD Card device. C. Stylus Slot Easy to take out and plug in the stylus pen. D. LED Indicator From left to right shows the status about Power mode, Battery mode, Storage and Wi-Fi status mode. E.
Rugged Computing 1.5 10.4 inch I/O Functions This section we will show the Tablet PC external connection parts and their functions. LED Indicator Status Description LED Term Power mode Battery Status Storage Status Wi-Fi Status Green light: when storage is under operation. No light means when storage stops operating. Green light: when Wi-Fi is under operation. No light means when Wi-Fi stops operating. LED Indicator Green light: When the Power is On.
Rugged Computing # Components See Other Intro. Function Description A. PCIExpress One PCIExpress slot for user to connect any PCIExpress 34 standard interface device. B. SDIO One SD Card slot for user to connect SD Card device. C. Stylus Slot Easy to take out and plug in the stylus pen. Power On Button Push 4 seconds continuous to turn-on the PC. Need 8 seconds continuous push to force the Tablet PC turn-off immediately. E.
Rugged Computing 1.6 12.1 inch I/O Functions This section we will show the Tablet PC external connection parts and their functions. LED Indicator Status Description LED Term Power mode Battery Status Storage Status Wi-Fi Status Green light: when storage is under operation. No light means when storage stops operating. Green light: when Wi-Fi is under operation. No light means when Wi-Fi stops operating. LED Indicator Indicator Status Description Green light: When the Power is On.
Rugged Computing # Components Function Description See Other Intro. A. PCIExpress One PCIExpress slot for user to connect any PCIExpress 34 standard interface device. B. SDIO One SD Card slot for user to connect SD Card device. C. Stylus Slot Easy to take out and plug in the stylus pen. D. LAN Port The product can support 10/100/1000 Mbit Giga LAN ethernet, connect RJ-45 LAN cable to LAN port. E. Audio Port Audio ouput, Microphone input F. USB Two USB2.
Rugged Computing 1.7 Key Part Accessories (Optional) 1.7.1 Multi-functional Desktop Docking Station Our Tablet PC can support one Multi-functional Desktop Docking Station for optional accessory. The Desktop Docking Station have one charger for other battery packs and expansion slots. 1.7.2 Multi-functional Vehicle mount Docking Tablet PC can support one Multi-functional Vehicle Mount Docking. Vehicle mount Docking can charger from car power charger and expansion slots. Through the first Chapter 1.1 to 1.
Rugged Computing 1.6 Product Specification System Specification System Processor Intel® Atom Z530 1.6GHz BIOS AMI System BIOS System Chipset Intel® US15W Chipset System Memory 1 x SODIMM, Max. 2GB DDR2 533 LAN Controller Realtek RTL8111B Giga LAN Controller Storage 2.5" IDE 80GB HDD(Default), Industrial Compact Flash Card, 2.5" Automobile HDD or 2.5" Solid State Disk(SSD) Audio Audio out for headset, Micro-in for microphone jack, 1.
Rugged Computing System Specification (continues) Mechanical and Environment Weight 2.2 Kg / 2.5Kg/ 3Kg (w/o accessories) Operating Temperature -20℃ to 60℃ Operating Humidity 10% to 90% (non condensing) IP Proof IP54 Mounting VESA mount, Vehicle mount Shock* MIL-STD-810F M514.5 Vibration* MIL-STD-810F M514.
Rugged Computing CHAPTER 2 Operating Tablet PC and HotTab Hotkey Utility Users Manual 22 Rugged Tablet PCs
Rugged Computing CHAPTER 2 OPERATING TABLET PC AND HOTTAB HOTKEY UTILITY This Chapter will guide you how to operate the Tablet PC, including start / stop the PC, and how to use menu function including basic hardware function adjustment and the HotTab hotkey utility software that is very easy and helpful for operating the computer. 2.
Rugged Computing 2.2 Quick to Know Menu and HotTab Hotkey Function This section will introduce you about our easy-of-use front panel functionality. Our Tablet PC front panel buttons support very easy way and useful function to adjust Brightness, Volume and watch Battery’s current status. For six programmable Hotkeys function can also be defined by user to control by their common use application. 2.2.
Rugged Computing Menu Function Adjustment # Action Function Description 4 Funtion Adjustment Show current on/off of Wireless\ Bluetooth mode. This is a mix solution bar with four choices. 1. WiFi+ Bluetooth On Push “Menu” button 4th 2. WiFi On / Bluetooth Off 3. Bluetooth On / WiFi Off Time 4. WiFi+ Bluetooth Off Click “Up” button to go Right and Click ”Down” button to go Left.
Rugged Computing 2.2.2 How to use HotTab Hotkey Function From the operation system installation, we will provide you Hot-tab Hotkey software utility. After installation, you can see the icon on desktop of computer. Click the icon and you can see the software application at center of desktop. The HotTab Hotkey software program is the six key programmable application software; we choose some usual applied functions for default setup.
Rugged Computing Hot-Tab Hotkey Function Use the HotTab software utility to make it easy to program and define hot keys by customer’s usual application. # Action Function Description 1 Press “F1” Default:Hot TAB functions 2 Hold “F1” Default:Outlook Express 3 Press “F2” Default:Internet Explorer 4 Hold “F2” Default:Media Player 5 Press “F3” Default:My Document Funtion Adjustment Long Push: 4sec. Use “Browse” and choose the execution program file Long Push: 4sec.
Rugged Computing B. Screen rotation C.
Rugged Computing D. Handwriting(for Option): The Handwriting software utility is optional by third party software. 2. F2 to F3 function key You can use “Browse” and choose the execution program file.
Rugged Computing 3. Power Manage function: Select optimized performance section by application to save power. 4. System Information When you press menu 5th time, you can see the system information of Utility version, BIOS version and EC version.
Rugged Computing 5. Low battery warning: When the battery under 10%, system will show the battery low to remind you to change the new battery or insert adapter to charge. 6. Touch Lock Function: You can use HotTAB to Lock the screen for preventing to touch the screen. And you need to unlock the screen by mouse or touch to drew on the block.
Rugged Computing 2.2.3 Hot-Swap Second Battery Operation (Optional) A. Second Battery Specification The second Li-Ion 2600mAh back-up battery support half operating time of main battery. Second Battery Specification: -Li-Ion 2600mAh Battery Cell, 11.1V B. Installed Hot-Swap Battery Step 1 Plug the second battery while the Main battery in low power status.
Rugged Computing Step 2 Use the two Thumb screws to tighten the second battery. Step 3 Push Menu button that will show the Main/ Second Battery Status. **NOTE When the Hot-Swap battery low, PUSH F3L to change battery back to Main battery power, and swap other Hot-swap battery.
Rugged Computing 2.2.4 Connecting to a Wireless Network (Optional) Connecting to a wireless network: 1. Push Menu function and making sure the Wireless status is “On”. 2. By using the default build-in module, the The Ralink wireless connection utility will be disabled. Windows Wireless Network Connection is recommended in our Tablet PC systems.
Rugged Computing 3. Right-click the Wireless Network Connection in Windows system tray and choose “Launch Config Utility”. 4. The Wireless Network Connection program will detect all wireless links automatically and show each status, choose one you want to link and click “Connect”.
Rugged Computing 5. Log in password if necessary, and click “OK” to enter detailed connection quality status. 6. The Optimized Use for Wi-Fi, 8.4” / 10.4” /12.1”. (Antenna’s location) A. 8.
Rugged Computing B. 10.4” Wireless Antenna’s location: C. 12.
Rugged Computing 2.2.5 Using the Bluetooth Wireless Feature (Optional) We apply Bluetooth 2.1+ EDR module for default function of the Tablet PC series. Depending on your application, the Bluetooth module can give you capability for short-range wireless communicaitons between devices without requiring a cable connection. The transmission can go through walls, pockets and briefcases as long as two devices are within range around 10 meters. Following the easy step to connect to the Bluetooth communication. 1.
Rugged Computing 3. Choose the bluetooth device you want to connect, and left click to choose “Connect”. Then the device will be connected to the module. 4. When under connecting, left click to check the connection status, or choose “Unplug” to remove the connection.
Rugged Computing CHAPTER 3 Expanding Your Tablet PC Users Manual 40 Rugged Tablet PCs
CHAPTER 3 EXPANDING YOUR TABLET PC 3.1 How and When to Use BIOS Setup For enter to the Tablet PC BIOS setup, you need connect to external USB interface keyboard, press “Del” key when the prompt appears on the screen during start up. The prompt screen shows only few seconds so need press Del key quickly. **NOTICE Updated BIOS version may be published after the manual is released. Check with the latest version of BIOS on website. You may need to run BIOS setup utility when the below status. 1.
Rugged Computing 3.2 BIOS Functions 3.2.1 Main Menu The main menu contains the information of the Tablet system including BIOS version, processor, system memory, time, and date. 3.2.2 Advanced Menu The advanced menu contains the configuration information of CPU, IDE/ SATA, ACPI, APM Configuration and Battery Calibration.
Rugged Computing 1. CPU Configuration 2.
Rugged Computing 3.
Rugged Computing 4. Battery Calibration 3.2.3 Boot Menu The Boot menu sets the sequence of the devices to be searched for the operating system. The bootable devices will be automatically detected during POST and shown here, allowing you to set the sequence that the BIOS uses to look for a boot device from which to load the operating system.
Rugged Computing Chck the Hard Disk Device in Hard Disk Drives.
Rugged Computing 3.2.4 Security Menu Change Supervisor Password, Change User Passwaord and Clear User Password.
Rugged Computing 3.2.5 Exit Menu The Exit menu displays ways of exiting BIOS Setup utility. After finishing with your settings, you must save and exit so that the changes can take effect. Save Changes and Exit saves the changes you have made and exits BIOS Setup utility. Discarding Changes and Exit exits BIOS Setup utility without saving the changes you have made. Discard Changes restores the previous values for all the items. Load Optimal Default loads the factory default values for all the items.
Rugged Computing CHAPTER 4 Driver Installation Users Manual 49 Rugged Tablet PCs
Rugged Computing CHAPTER 4 DRIVER INSTALLATION Through Chapter 4.1 to 4.8 to go further for Rugged Tablet PC driver installation guide for Windows XP Professorial, you can easily install all related drivers if without operation system by yourself. The default system will include operation system and you need to install drivers at first time use. 4.1 Installation of Chipset Driver Installation Step.1 Insert the Driver Utility CD into CD-ROM.
Rugged Computing Step.3 Click on “Yes“ to install the driver. Step.4 Follow the step by step and click on “Next” to install the driver, then Click on “Yes, I want to restart this computer now” to proceed.
Rugged Computing 4.2 Graphic Driver Installation The system is equipped with Intel 945 GSE Chipset + US15W Companion Device. The Intel Graphic Drivers should be installed first, and it will enable “Video Controller (VGA compatible). Follow the instructions below to complete the installation. You will quickly complete the installation. Step.1 Insert the Driver Utility CD into CD-ROM. Open the file folder named “b_ Graphic “, and Click on “Setup” to start the setup procedure. Step.
Rugged Computing 4.3 Audio Driver Installation The VT1708A HAD is a High Definition Audio Codec. Build-in High Quality Headphone Amplifier and 4 Stereo DACs, Support 16-bit and 192 KHz Samples. It integrates Sample Rate Converters on all channels. This codec is designed with aggressive power management to achieve low power consumption. Step.1 Insert the Driver Utility CD. Open the file folder named “c_ Audio” and click on “Setup” to start the setup procedure. Step.2 Click on “Next” to install the driver.
Rugged Computing Step.3 Click on “VIA HD Audio Codec Driver v5.50.30.080514” then chick on “Next” to proceed. Step.4 Click on “Yes, I want to restart my computer now” to finish the installation.
Rugged Computing 4.4 LAN Driver Installation Follow the steps below to complete the installation of the Realtek RTL8111B LAN drivers. You will quickly complete the installation. Step.1 Insert the Driver Utility CD. Open the file folder named “d_ LAN”, and Click on “Setup” to start the setup procedure. Step.2 Click on “Next” and step by step to install the driver then click on “Finish” and proceed.
Rugged Computing 4.5 Wireless LAN Driver Installation Following the step by step to finish the driver installation Step.1 Insert the Driver Utility CD. Open the file folder named “e_ Wireless” to start the installation program. NOTE: If you have installed your HotTab function, you must enable the wireless to install your wireless driver.
Rugged Computing 4.6 Bluetooth Driver Installations Following the step by step to finish the driver installation Step.1 Insert the Driver Utility CD. Open the file folder named “f_ Bluetooth”. Press “Install” to start the installation program. Step.
Rugged Computing Step.3 Follow the installation procedure step by step and click “Next” to finish the driver installation.
Rugged Computing 4.7 HotTab Utility Driver Installations With our HotTab software application utility, user can very easy to control and program their usual hotkey for help their job. Step.1 Insert the Driver Utility CD. Open the file folder named “g_ Hot TAB”. Press the “Setup.exe” to start the installation program. Step.2 Following the step by step and click “Next” to start the installation, Click “Close” to finish the installation. Note: Microsoft .NET Framework 2.
Rugged Computing 4.8 Touch Driver Installation Touch Kit is the Premier Touch software, which contains drivers of the touch panel controllers for the specified communication connectors, RS232, PS/2 and USB, and the other two utilities. The two utilities are as follows: Touch Tray support This is utility for emulating the right and left button of mouse through controlling touch panel. Users can toggle between right or left mouse buttons by this utility.
Rugged Computing Step.2 Following the step by step and click “Next” to start the installation, Click “Close” to finish the installation. Step.3 Choose Install PS/2 interface driver and select “Next” to proceed.
Rugged Computing Step.4 Choose “None” for 4 point calibration and click “Next” to continue installation. Step.5 After few seconds of installation, click on “Finish” and choose restart computer to finish the installation.
Rugged Computing Note: Configuration Utility After finishing the installation, please follow the steps to test the configuration utility. Step.1 Click the “TouchKit” icon function in the desktop. Step.2 Enter “General” function and choose the language you need. Then go to next step.
Rugged Computing Step.3 Correct 4 point calibrations on screen with the Panel. Screen display as follows Step.4 If 4 point’s calibration tests are fine, push “yes” to finish the test.
Rugged Computing CHAPTER 5 Tips to take care of Your Tablet PC Users Manual 65 Rugged Tablet PCs
Rugged Computing CHAPTER 5 TIPS TO TAKE CARE OF YOUR TABLET PC There are few tips for location, cleaning guideline, and for take care of battery pack and touch-screen. Please follow these tips for safeguarding the integrity of your tablet PC data as well as the tablet PC itself. 5.1 General Protection Tips for Tablet PC Please check the general protection tips for Tablet PC location and normal operating. Please do not put heavy objects on top of the tablet PC as this may damage the display.
Rugged Computing 5.3 Battery Protection Tips It is recommended temperature range for charging the battery pack between 5℃ ~ 45℃. To avoid harm to the battery, recharge the battery pack when it is nearly discharged. When recharging, make sure that the battery pack is fully charged.
Rugged Computing 5.4 Touch screen Protection Tips Avoid using excessive force to the display, when use the finger or the included touch screen stylus pen on the display, the recommended force can not over 200gf. Besides the included stylus, using a sharp or metallic object may cause scratches and damage the display, thereby causing errors. Wipe the touch screen with a clean, soft, lint-free cloth.
Rugged Computing 5.5 Trouble shooting from A to L A. Battery Problem Condition The battery does not charge (Battery Charge indicator does not light orange. Check Point Make sure that the AC adapter is properly connected. Make sure that the battery is not too hot or cold. Allow time for the battery pack to return to room temperature. Make sure that the battery pack is installed correctly. Make sure that the battery terminals are clean. B.
Rugged Computing E. Hardware Driver Problem Condition Check Point The device may not be correctly configured in the BIOS Setup program. Run the BIOS Setup program to identify the new type. Make sure if any device driver needs to be installed. (Refer to the documentation that came with the device.) The tablet PC does not recognize a newly Make sure if the device needs any jumper or switch installed device. settings. (Refer to the documentation that came with the device.
Rugged Computing H. Power Management Problems Condition Check Point If you have a connection to another computer, the The tablet PC does tablet PC does not enter Standby or Hibernation mode not enter Standby or if the connection is actively in use. Hibernation mode Make sure that the Standby or Hibernation time-out is automatically. enabled. Doesn’t enter Standby or Hibernation mode immediately. If the tablet PC is performing an operation, it normally waits for the operation to finish.
Rugged Computing J. Software Problems Condition An application program does not work correctly. K. Sound Problems Condition No sound is produced. Distorted sound is produced. Check Point Make sure that the volume control is not set too low. Increase volume by pressing the button. Make sure that the tablet PC is not in Standby mode. If using an external speaker, make sure that the speaker is properly connected. Make sure that the volume control is not set too high or too low.
Rugged Computing L. Wireless LAN Problem Condition Can not use the wireless LAN feature. Transmission quality is poor. Radio interference exists. I cannot connect to another wireless LAN device. I cannot communicate with the computer in the network when Infrastructure mode is configured. I cannot access the network. Users Manual Check Point Make sure that the wireless LAN feature is turned on. Your tablet PC may be in an out-of-range situation.