
Manual
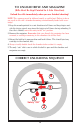


20
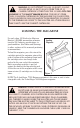
REASSEMBLY
Again, Be Sure Rifle is Unloaded!
1. Reassembly of bolt into receiver:
a. To reassemble bolt handle and bolt in the receiver, position the rear end
(cone pointed) of the recoil spring guide rod in the mating recess near the
rear right side of the receiver. The recoil spring must be flat against the side
and “bottom” of the receiver.
b. Maintain the guide rod in its proper position by keeping pressure on the
bolt handle with the left forefinger and thumb. At the same time, use the
flat side of the screwdriver blade to compress the recoil spring by drawing it
against that area of the bolt handle near to the spring. In accomplishing this
spring compression it is necessary to maintain the same pressure on the
screwdriver with the right hand as that being maintained (rearward and
inward) on the bolt handle with the left hand.
c. When the spring is fully compressed, maintain it in that position with the
left hand and with the right hand lay the recessed section of the top of the
bolt on the section of the bolt handle that mates with it. Press down on the
bolt until a ‘click’ is heard. At this point allow the bolt handle (with bolt
attached) to move forward slowly.
d. Cycle the bolt handle a few times to be certain the components are cor-
rectly assembled.
2. Reassembly of rifle:
a. Install bolt stop pin and then lay the trigger guard in place and install the
two receiver pins.
b. Assemble the barrel-receiver to the stock by following, in reverse order,
steps 1 through 5 under the “Disassembly” instructions on pages 18 & 19.
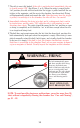
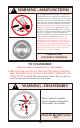
Guns should not be stored loaded or cocked!
MAGAZINE INSPECTION AND CARE
Check the magazine frequently. The rotor must move freely and have adequate
tension so that each cartridge is quickly raised to the feeding position. At the
time of manufacture, proper rotor tension is set by rotating the magazine cap
nut until the r
otor stops turning. Then the nut is turned an additional 1 1/4
turns beyond the ‘stop’ position.
To test the rotor tension, load one cartridge into the magazine and then firmly
press against the side of the cartridge case. Remove your finger quickly. The car-
tridge should instantly and fully move in to the feeding position. If it does not,
the magazine should be cleaned. If cleaning does not restore proper rotor ten-
sion, do not use the magazine. (NOTE: After testing, remove the test cartridge).
When cleaning is necessary, use a solvent that will not rust the metal compo-
nents or adversely affect the plastic magazine box. After the magazine has been
soaked in solvent to loosen foreign matter, be certain to shake it vigorously (with
the loading opening away from you) to remove solvent or residue from within
the magazine.
After cleaning, always check to be certain that rotor movement and tension are
correct, and that no solvent or debris remain. Do not disassemble the magazine.
2. Using a cleaning rod, run a solvent-wetted patch through the bore several