
Specifications


DeviceMaster Installation and Configuration Guide: 2000506 Rev. B Secure COM Port Set Up - 47
Installing the Secure COM Port Redirector
If a CA certificate is uploaded, the DeviceMaster only allows SSL/TLS connections
from client applications that provide to the DeviceMaster an identity certificate that
has been signed by the CA certificate that was uploaded to the DeviceMaster.
This uploaded CA certificate that is used to validate a client's identity is sometimes
referred to as a “trusted root certificate”, a “trusted authority certificate”, or a
“trusted CA certificate”. This CA certificate might be that of a trusted commercial
certificate authority or it may be a privately generated certificate that an
organization creates internally to provide a mechanism to control access to
resources that are protected by the SSL/TLS protocols.
To control access to the DeviceMaster's SSL/TLS protected resources you should
create your own custom CA certificate and then configure authorized client
applications with identity certificates signed by the custom CA certificate.
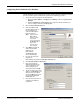
a. Click Browse to locate the Client Authentication Certificate.
b. Click Upload.
17. After completing the key and certification management, click Save.
18. To configure another port as a secure COM port, update the Serial Configuration (Step
2).
19. Click Reboot for the changes to take affect.
20. If you want to configure a secure COM port, you are ready to install the secure port
redirector using the Installing the Secure COM Port Redirector subsection.
Installing the Secure COM Port Redirector
You can refer to the help system in the secure COM port redirector or use the following
procedure to install the secure port redirector for Windows.
1. Locate the secure COM port redirector on the CD or download
the latest version.
2. Double-click the setup-spr.msi file.
3. Click Next at the Setup Wizard.
4. Click I accept the terms in the License Agreement and Next.
5. Optionally, browse and select a different installation path and then click Next.
6. Verify the installation selections and then click Install.
7. Click Finish to complete the installation and open the secure port redirector.
8. Configure the port with the secure port redirector using the next subsection.