
Specifications


16 - Hardware Installation DeviceMaster Installation and Configuration Guide: 2000506 Rev. B
1-Port - Embedded Model
1 - Po r t - E m b e dde d M o de l
Installing the DeviceMaster 1-Port Embedded system follows these basic steps:
• Building the serial ribbon cable (below).
• Mounting the Embedded
on Page 17 and installing light pipes.
• Attaching the Network and Serial Cables
on Page 18.
• Connecting the Power and Verifying Installation
on Page 18.
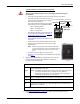
Observe proper ESD techniques when handling the DeviceMaster.
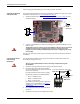
Building the Serial
Ribbon Cable
Use the following information to build a DB9 serial ribbon cable to connect to the
DeviceMaster 1-Port Embedded IDC10 connector (J3).
Caution
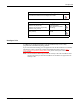
J3 Header RS-232 RS-422 RS-485
1 CD Not used Not used
2 DSR Not used Not used
3RxDRxD-Not used
4RTSTxD+TRX+
5TxDTxD-TRX-
6CTSRxD+Not used
7 DTR Not used Not used
8 RI Not used Not used
9 GND Not used Not used
10 Not connected
Pin 1
Pin 6
1
2
9 10
Ribbon Cable
10-Pin
Socket
Pin 5
Pin 9
DB9
Male
J3