
Intercom System User Manual
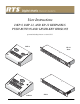
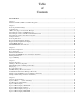


Table Of Contents
- READ ME FIRST
- CHAPTER 1 Menu List for DKP-8, DKP-12, and KP-12 Keypanels
- CHAPTER 2 Power-Up and Initial Settings
- CHAPTER 3 Basic Intercom Operation
- CHAPTER 4 Telephone Operation
- CHAPTER 5 Using the Top-Level Menu
- General Description
- Top Level Menu, - - - - (Clear call waiting)
- Top Menu Level, Call List Names
- Top Level Menu, Display
- General Description
- Top Level Menu, Display, CHANS ON
- Top Level Menu, Display, Exclusive
- Top Level Menu, Display, Group (1-4)
- Top Level Menu, Display, KEY ICOM
- Top Level Menu, Display, KEY TYPE
- Top Level Menu, Display, Level 2
- Top Level Menu, Display, Listen
- Top Level Menu, Display, Page Use
- Top Level Menu, Display, Port Num
- Top Level Menu, Display, SOLO
- Top Level Menu, Display, Version
- Top Level Menu, Key List
- Top Level Menu, Level
- Top Level Menu, Lists
- Top Level Menu, Menus
- Top Level Menu, Page (1-4)
- Top Level Menu, TGL LISN (Toggle Listen ON/OFF)
- CHAPTER 6 Menu Mode
- Select Control Operation in Menu Mode
- Menus, Autodial (for KP-12/DKP-12 Only)
- Menus, KEY ASGN
- Menus, KEY ASGN, General Description
- Menus, KEY ASGN, AUTODIAL (For KP-12, DKP-12 Only)
- Menus, KEY ASGN, AUTOFUNC
- Menus, KEY ASGN, CLEAR
- Menus, KEY ASGN, COPY
- Menus, KEY ASGN, LISTS
- Menus, KEY ASGN, LISTS
- Menus, KEY ASGN, LISTS, IFB
- Menus, KEY ASGN, LISTS, IFSL
- Menus, KEY ASGN, LOCAL I/O (For KP-12 Only)
- Menus, KEY ASGN, PHONE (For KP-12, DKP-12 Only)
- Menus, KEY ASGN, REDIAL (For KP-12, DKP-12 Only)
- Menus, KEY ASGN, UPL
- Menus, Key Opt Menu
- General Description
- Menus, KEY OPT, BTN LOCK (Button Lock)
- Menus, KEY OPT, CHIME
- Menus, KEY OPT, CLR OPT
- Menus, KEY OPT, COPY
- Remember to save you changes if you want them retained for future use. See “Menus, SERVICE, SAVE ...
- Menus, KEY OPT, EXCLUSIVE
- Menus, KEY OPT, GROUP (1-4)
- Menus, KEY OPT, LATCHING
- Menus, KEY OPT, SOLO
- Menus, SERVICE MENU
- General Description
- Menus, SERVICE, DIMMER
- Menus, SERVICE, FOOT SW (with GPI module ONLY)
- Menus, SERVICE, KEY TYPE
- Menus, SERVICE, LOCK/UNLOCK
- Menus, SERVICE, MIC CTRL
- Menus, SERVICE, MIC COMP
- Menus, SERVICE, MIC GAIN
- Menus, SERVICE, MOD ASGN
- Menus, SERVICE, MUTE LVL
- Menus, SERVICE, OPTO-ISO (KP-12 with GPI Module Only)
- Menus, SERVICE, OUT CTRL
- Menus, SERVICE, RESET
- Menus, SERVICE, SAVE CFG
- Menus, SERVICE, SET ADDR
- Menus, SERVICE, SIDETONE
- Menus, SERVICE, TALLY
- Menus, SERVICE, TEST PNL
- Menus, SERVICE, TONE
- Menus, SERVICE, USM (Unswitched Microphone, for KP-12 with Rear Connector Module Only)
- Appendix A KP-12 Audio Transmit Board Connections
- Appendix B Replacing the KP-12 Power Supply

1
READ ME FIRST
READ ME FIRST
This manual is designed for two basic types of users: 1) those who are not involved in the setup or maintenance of the key-
panel, but simply want to use it to communicate; and 2) those who will use the advanced features to modify the keypanel’s
operation and key assignments. The second type of user may also be the maintenance person and/or system administrator for
the intercom system.
The first type of user should skip to “Basic Intercom Operation” on page 11. If you will also be using the optional telephone
interface (with KP-12 only) refer to the information in “Telephone Operation” on page 13. Additionally, a few of the items in
“Using the Top-Level Menu” on page 15 may be of interest.
The second type of user should become familiar with “Power-Up and Initial Settings” on page 9, as well as the basic operation.
The advanced features are arranged in a system of menus accessible using the control labeled “SELECT” on the front panel.
The entire menu structure is summarized in Table 1 on page 26, with references to the page numbers where you can find
detailed information. Use this list as your starting point to become familiar with the advanced features. Be sure to also read any
general information supplied at the start of each menu section. At first, the menu system might seem complicated, but
navigation through it is actually quite basic, and experience has shown that users catch onto it fairly quick. From any given
level, just turn the SELECT control to find the item that you want, then quickly press and release (tap) the control to select that
item. For many items, brief instructions are given as you navigate. From any level in the menus, you can double-tap the
SELECT control to exit to the next higher level.