
Intercom System User Manual

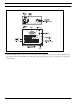


Table Of Contents
- READ ME FIRST
- CHAPTER 1 Menu List for DKP-8, DKP-12, and KP-12 Keypanels
- CHAPTER 2 Power-Up and Initial Settings
- CHAPTER 3 Basic Intercom Operation
- CHAPTER 4 Telephone Operation
- CHAPTER 5 Using the Top-Level Menu
- General Description
- Top Level Menu, - - - - (Clear call waiting)
- Top Menu Level, Call List Names
- Top Level Menu, Display
- General Description
- Top Level Menu, Display, CHANS ON
- Top Level Menu, Display, Exclusive
- Top Level Menu, Display, Group (1-4)
- Top Level Menu, Display, KEY ICOM
- Top Level Menu, Display, KEY TYPE
- Top Level Menu, Display, Level 2
- Top Level Menu, Display, Listen
- Top Level Menu, Display, Page Use
- Top Level Menu, Display, Port Num
- Top Level Menu, Display, SOLO
- Top Level Menu, Display, Version
- Top Level Menu, Key List
- Top Level Menu, Level
- Top Level Menu, Lists
- Top Level Menu, Menus
- Top Level Menu, Page (1-4)
- Top Level Menu, TGL LISN (Toggle Listen ON/OFF)
- CHAPTER 6 Menu Mode
- Select Control Operation in Menu Mode
- Menus, Autodial (for KP-12/DKP-12 Only)
- Menus, KEY ASGN
- Menus, KEY ASGN, General Description
- Menus, KEY ASGN, AUTODIAL (For KP-12, DKP-12 Only)
- Menus, KEY ASGN, AUTOFUNC
- Menus, KEY ASGN, CLEAR
- Menus, KEY ASGN, COPY
- Menus, KEY ASGN, LISTS
- Menus, KEY ASGN, LISTS
- Menus, KEY ASGN, LISTS, IFB
- Menus, KEY ASGN, LISTS, IFSL
- Menus, KEY ASGN, LOCAL I/O (For KP-12 Only)
- Menus, KEY ASGN, PHONE (For KP-12, DKP-12 Only)
- Menus, KEY ASGN, REDIAL (For KP-12, DKP-12 Only)
- Menus, KEY ASGN, UPL
- Menus, Key Opt Menu
- General Description
- Menus, KEY OPT, BTN LOCK (Button Lock)
- Menus, KEY OPT, CHIME
- Menus, KEY OPT, CLR OPT
- Menus, KEY OPT, COPY
- Remember to save you changes if you want them retained for future use. See “Menus, SERVICE, SAVE ...
- Menus, KEY OPT, EXCLUSIVE
- Menus, KEY OPT, GROUP (1-4)
- Menus, KEY OPT, LATCHING
- Menus, KEY OPT, SOLO
- Menus, SERVICE MENU
- General Description
- Menus, SERVICE, DIMMER
- Menus, SERVICE, FOOT SW (with GPI module ONLY)
- Menus, SERVICE, KEY TYPE
- Menus, SERVICE, LOCK/UNLOCK
- Menus, SERVICE, MIC CTRL
- Menus, SERVICE, MIC COMP
- Menus, SERVICE, MIC GAIN
- Menus, SERVICE, MOD ASGN
- Menus, SERVICE, MUTE LVL
- Menus, SERVICE, OPTO-ISO (KP-12 with GPI Module Only)
- Menus, SERVICE, OUT CTRL
- Menus, SERVICE, RESET
- Menus, SERVICE, SAVE CFG
- Menus, SERVICE, SET ADDR
- Menus, SERVICE, SIDETONE
- Menus, SERVICE, TALLY
- Menus, SERVICE, TEST PNL
- Menus, SERVICE, TONE
- Menus, SERVICE, USM (Unswitched Microphone, for KP-12 with Rear Connector Module Only)
- Appendix A KP-12 Audio Transmit Board Connections
- Appendix B Replacing the KP-12 Power Supply

13
CHAPTER 4
Telephone Operation
NOTE: KP-12 and DKP-12 Only, Requires optional TIF Interface.
If the intercom system is equipped with an optional TIF telephone interface, one or more intercom keys on the KP-12 keypanel
may be assigned for use as phone keys. There are three types of phone key assignments:
All-purpose phone key (usually identified as TEL1, TEL2, etc.): may be used for manual dialing, for last number redial, and
for auto-dialing any of ten stored phone numbers.
Redial Key (RDL): redials the last number when activated.
Autodial Key (ADL0-ADL9): dials one of ten previously saved autodial numbers when activated.
The following paragraphs describe how to use each of these three types of phone keys.
All-Purpose Phone Key Operation
The following paragraphs assume that a phone key has already been set up and is ready for use. If a phone key has not been set
up, see “Menus, KEY ASGN, PHONE (For KP-12, DKP-12 Only)” on page 33.
Names for general purpose phone keys are assigned, like any other intercom port name, using the intercom system
configuration software. Suggested names are TEL1, TEL2, etc. to distinguish phone keys from other types of intercom keys.
Manual Dialing with an All-Purpose Phone Key
1. Tap the phone key to begin your call.
This will place the keypanel in dial mode: the CALL indicator will turn on, and MAN DIAL (manual dial) will display in
the call waiting window. You should also hear the dial tone. (Note, you may hang up the phone line at this time by simply
tapping the phone key again.)
2. Tap the SELECT control to select MAN DIAL.
The twelve intercom keys can now be used to dial a telephone number. Each key corresponds to the number printed next to
it on the front panel. If the KP-12 has alphanumeric displays, the key numbers are displayed above each key.
3. Begin dialing the number by tapping the appropriate keys.
After you dial the first digit, END DIAL will appear in the call waiting window. When you have completed dialing, tap the
SELECT control to select END DIAL. This will return the KP-12 to normal operating mode. If the called party answers,
proceed with you conversation as for any other intercom call. To end the phone call, hang up as described below.