
User's Manual
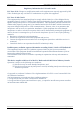
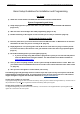
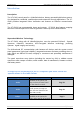
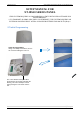
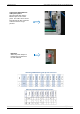
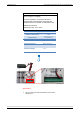
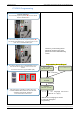
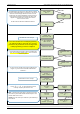
Table Of Contents
- Table of Contents
- Introduction:
- In order for an installation to be UL compliant you must follow the specifications in the table below:
- XT Initial Programming
- XT-IP620 Programming
- Device Installation
- Entering a Badge or Access Code for Arming/Disarming
- Configuration of Special Arming Modes:
- How to Disable/Enable Monitoring
- ETHERNET Parameters:
- How to test to the dispatch center
- How to Disable Monitoring
- How to test RF for deployment of devices
- XT-IP620 Power Chart
- Arming Input Wiring Diagram
- How to test to the dispatch center
- How to mount the XT-IP620
- Troubleshooting
- Monitoring Station is not getting ANY video but is getting signals:
- Monitoring Station is not getting any signals:
- Panel is staying CONNECTED WITH MONITOR STATION
- Unable to record device or getting ‘Pairing Failure’ error
- Outdoor MotionViewer Trips All the Time:
- XT-IP620 -SERIES ‘AFTER INITIAL PROGRAMMING’ FLOW CHART
- 1. LSH20 Control Panel Batteries:
- 2. LS14500 Peripheral Batteries: Excludes SE601 and SE651
- 3. Lithium Battery Storage:
- 4. Finding Manufacture Week and Year:
- 5. Event Log Ethernet Codes
- 6. Additional System Codes
- 7. Replacing Device and Control Panel batteries
- 8. Checking control panel firmware version

2012/1/9 Ed 1.1 Setup and Programming manual for XT-IP620 series
9 | Page
XT-IP620 Programming
Programming Device/Keypad
or
Reset the XTIP Panel:
Press and hold programming button () for 10sec until the
Indicator LED blinks twice
Press and instantly release the programming button (
).
The indicator LED will blink once. The panel is now in ‘Learn
Mode’ for the CMA/XMA/WMB keypad.
CLR & ESC/NO
<======XX======>
Insert all three batteries into the CMA/XMA/WMB and press
both the ESC/NO and CLR keys at the same time and
release.
The indicator LED on the keypad will blink rapidly.
YES/OK
KEYPAD 1
RECORDED
RSI (c)20##
www.RsiAlarm.com
<- LANGUAGE : ->
ENGLISH (US/AUS)
or
for language selection
YES/OK to apply
Other languages are available by scrolling with arrows.
ITALIANO, NEDERLANDS, DEUTSCH, CASTELLANO,
SVENSKA, PORTUGUES, FRANCAIS
Press YES/OK for the selected one.
*NOTE: If you are having issues
pairing the keypad to the panel,
please refer to the troubleshooting
section.
*NOTE: Once a language is chosen
it cannot be changed in
programming.