
User's Manual
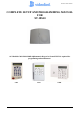
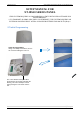
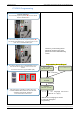
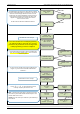
Table Of Contents
- Table of Contents
- Introduction:
- In order for an installation to be UL compliant you must follow the specifications in the table below:
- XT Initial Programming
- XT-IP620 Programming
- Device Installation
- Entering a Badge or Access Code for Arming/Disarming
- Configuration of Special Arming Modes:
- How to Disable/Enable Monitoring
- ETHERNET Parameters:
- How to test to the dispatch center
- How to Disable Monitoring
- How to test RF for deployment of devices
- XT-IP620 Power Chart
- Arming Input Wiring Diagram
- How to test to the dispatch center
- How to mount the XT-IP620
- Troubleshooting
- Monitoring Station is not getting ANY video but is getting signals:
- Monitoring Station is not getting any signals:
- Panel is staying CONNECTED WITH MONITOR STATION
- Unable to record device or getting ‘Pairing Failure’ error
- Outdoor MotionViewer Trips All the Time:
- XT-IP620 -SERIES ‘AFTER INITIAL PROGRAMMING’ FLOW CHART
- 1. LSH20 Control Panel Batteries:
- 2. LS14500 Peripheral Batteries: Excludes SE601 and SE651
- 3. Lithium Battery Storage:
- 4. Finding Manufacture Week and Year:
- 5. Event Log Ethernet Codes
- 6. Additional System Codes
- 7. Replacing Device and Control Panel batteries
- 8. Checking control panel firmware version

2012/1/9 Ed 1.1 Setup and Programming manual for XT-IP620 series
4 | Page
Basic Setup Guidelines for Installation and Programming
Pre-Setup
1) Obtain the account number and IP/Domain information from the Central Station.
System Programming and Setup
1) Setup and program the system in the office or in your vehicle. DO NOT MOUNT THE DEVICES.
(Pages 6-15)
2) Add user codes and or badges after initial programming. (Pages 17-18)
3) Disable monitoring so that signals are not sent until you are ready to send them. (Page 19)
Deploying the System on Site
1) Place
the panel where you want to mount it and run the Ethernet cable. In Maintenance run the ETH.
STATUS test to make sure you are receiving an IP. (Page 20)
2) Deploying Devices: Use your keypad to run the RF test for each device. If you get a 9/9 for your RF
test on the first device, then mount it. If not, you will need to move the device to get optimal signal.*
(Page 21)
3) Re-enable monitoring before you send signals (Page 19)
a. If you are currently using TMT Installer to program the system you can now take still pictures
from each MotionViewer using the software. See TMT Installer Users Manual available on
http://support.videofied.com
4) Once you have everything mounted, arm the system and trip one MotionViewer at a time. Make sure
you stand in front of each MotionViewer for 10 seconds so the central station has some video to look
at. (Page 24)
5) After you have sent signals to central station, call to verify.
The following pages will go through each one of these steps and, if you have any issues please consult the
troubleshooting section Pages 26-28. If you still cannot resolve the issue, please feel free to call technical
support through live support chat and ticket submission at support.videofied.com.
Sleeping mode and Wake-up on the CMA:
They keypad backlight will go out after 30 seconds of inactivity. When you press a button the keypad wakes up. The first touch on
the pad that wakes it up will not be a registered command and will only wake up the keypad.
Sleeping mode and wake-up on the XMA/WMB:
The keypad backlight will go out after 30 seconds of inactivity. The first touch on the keypad will wake up the keypad and will
register as a command to the control panel.