
User's Manual
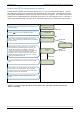
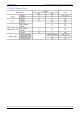
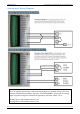
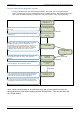
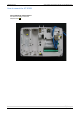
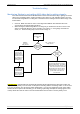
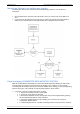
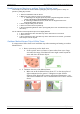
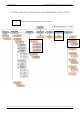
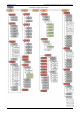
Table Of Contents
- Table of Contents
- Introduction:
- In order for an installation to be UL compliant you must follow the specifications in the table below:
- XT Initial Programming
- XT-IP620 Programming
- Device Installation
- Entering a Badge or Access Code for Arming/Disarming
- Configuration of Special Arming Modes:
- How to Disable/Enable Monitoring
- ETHERNET Parameters:
- How to test to the dispatch center
- How to Disable Monitoring
- How to test RF for deployment of devices
- XT-IP620 Power Chart
- Arming Input Wiring Diagram
- How to test to the dispatch center
- How to mount the XT-IP620
- Troubleshooting
- Monitoring Station is not getting ANY video but is getting signals:
- Monitoring Station is not getting any signals:
- Panel is staying CONNECTED WITH MONITOR STATION
- Unable to record device or getting ‘Pairing Failure’ error
- Outdoor MotionViewer Trips All the Time:
- XT-IP620 -SERIES ‘AFTER INITIAL PROGRAMMING’ FLOW CHART
- 1. LSH20 Control Panel Batteries:
- 2. LS14500 Peripheral Batteries: Excludes SE601 and SE651
- 3. Lithium Battery Storage:
- 4. Finding Manufacture Week and Year:
- 5. Event Log Ethernet Codes
- 6. Additional System Codes
- 7. Replacing Device and Control Panel batteries
- 8. Checking control panel firmware version

2012/1/9 Ed 1.1 Setup and Programming manual for XT-IP620 series
28 | Page
Unable to record device or getting ‘Pairing Failure’ error
This usually occurs when the device still has a pairing key from a previous system or setup. To
perform a pairing key override:
o 1. Remove all batteries from the device.
o 2. Make sure your system is ready to record devices:
o A. If learning in the keypad, press the panel’s programming button. DO NOT
HOLD THE PANEL’S PROGRAMMING BUTTON
o B. If learning in additional devices, make sure the keypad reads ‘Press
Programming Button Of Device’
o 3. Insert a single battery into the device.
o 4. Wait 1 second for device to power up.
o 5. Press programming button of device (for keypads press ‘CLR’ & ‘ESC/NO’ keys at the
same time)
For the 4-button remote keyfobs the process is slightly different:
o 1. Press and hold the ‘ON’ and ‘OFF’ keys at the same time for 12 seconds
o 2. Wait 1 second
o 3. Press and hold the ‘ON’ and ‘OFF’ keys at the same time for 5 seconds, you should
hear 4 beeps from the keyfob.
Outdoor MotionViewer Trips All the Time:
It is important to follow these basic installation tips when mounting and aiming an outdoor
MotionViewer
o 1. Protect your assets, not the whole area.
• Secure specific assets or clusters of assets rather than cover a large
area where the range of the MotionViewer might extend beyond the
assets and detect irrelevant objects.
o 2. Terminate the view of the MotionViewer.
• Make sure to tilt the MotionViewer down 5-7° so that its top line of
sight terminates into the ground. Taking into account all three
elements; PIR, digital video camera, and infrared illuminators – you
will want to terminate the view of the MotionViewer at 40 ft. from the
device.