
User's Manual
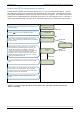
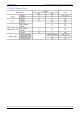
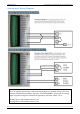
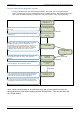
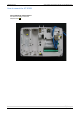
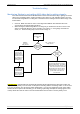
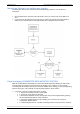
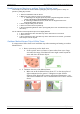
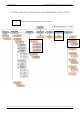
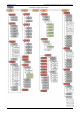
Table Of Contents
- Table of Contents
- Introduction:
- In order for an installation to be UL compliant you must follow the specifications in the table below:
- XT Initial Programming
- XT-IP620 Programming
- Device Installation
- Entering a Badge or Access Code for Arming/Disarming
- Configuration of Special Arming Modes:
- How to Disable/Enable Monitoring
- ETHERNET Parameters:
- How to test to the dispatch center
- How to Disable Monitoring
- How to test RF for deployment of devices
- XT-IP620 Power Chart
- Arming Input Wiring Diagram
- How to test to the dispatch center
- How to mount the XT-IP620
- Troubleshooting
- Monitoring Station is not getting ANY video but is getting signals:
- Monitoring Station is not getting any signals:
- Panel is staying CONNECTED WITH MONITOR STATION
- Unable to record device or getting ‘Pairing Failure’ error
- Outdoor MotionViewer Trips All the Time:
- XT-IP620 -SERIES ‘AFTER INITIAL PROGRAMMING’ FLOW CHART
- 1. LSH20 Control Panel Batteries:
- 2. LS14500 Peripheral Batteries: Excludes SE601 and SE651
- 3. Lithium Battery Storage:
- 4. Finding Manufacture Week and Year:
- 5. Event Log Ethernet Codes
- 6. Additional System Codes
- 7. Replacing Device and Control Panel batteries
- 8. Checking control panel firmware version

2012/1/9 Ed 1.1 Setup and Programming manual for XT-IP620 series
24 | Page
How to test to the dispatch center
Testing to the dispatch is done twice during installation. Once while you are programming the
system and then again once the installation has been completely finished. Although both will use the
same steps the initial test will be just confirmation using one device to verify the programming.
10/12/27 10:53
DISARMED LVL:1
ARMING THE
SYSTEM
SYSTEM ARMED
Enter a User code and press YES/OK or present a badge to
the reader.
The system will sound the exit delay through the keypad and
badge reader.
INTRUSION
DETECTED
(DEVICE NAME)
(AREA)
The display will tell you that there has been an intrusion since
the last time the system was armed. Press YES/OK to
continue
After pressing YES/OK the keypad will tell you which device
has been triggered. Press YES/OK to continue.
Once the delay has expired and the keypad says SYSTEM
ARMED, put motion in front of a MotionViewer. If the
MotionViewer is in area 1 you will need to wait for the entry
delay to expire before disarming the system. Once the
system has gone into alarm enter a User Code followed by
YES/OK or present a badge to the reader to disarm.
The system will go back to the main menu automatically but
will not allow you to move around in programming until the
system has disconnected from the central station.
YES/OK
YES/OK
YES/OK
YES/OK
10/12/27 10:53
****
10/12/27 10:53
DISARMED LVL:1
SYSTEM ARMED
****
To verify that the system has transmitted you must contact
the Dispatch Center and have the account information ready
Note: Send 1 MotionViewer in at a time and verify with Central Station that they are
getting Alarm and Video before tripping another MotionViewer. This will save time with
the Central Station.