
User's Manual
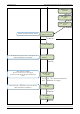
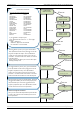
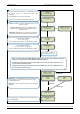
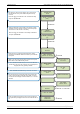
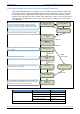
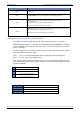
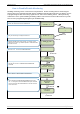
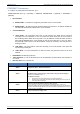
Table Of Contents
- Table of Contents
- Introduction:
- In order for an installation to be UL compliant you must follow the specifications in the table below:
- XT Initial Programming
- XT-IP620 Programming
- Device Installation
- Entering a Badge or Access Code for Arming/Disarming
- Configuration of Special Arming Modes:
- How to Disable/Enable Monitoring
- ETHERNET Parameters:
- How to test to the dispatch center
- How to Disable Monitoring
- How to test RF for deployment of devices
- XT-IP620 Power Chart
- Arming Input Wiring Diagram
- How to test to the dispatch center
- How to mount the XT-IP620
- Troubleshooting
- Monitoring Station is not getting ANY video but is getting signals:
- Monitoring Station is not getting any signals:
- Panel is staying CONNECTED WITH MONITOR STATION
- Unable to record device or getting ‘Pairing Failure’ error
- Outdoor MotionViewer Trips All the Time:
- XT-IP620 -SERIES ‘AFTER INITIAL PROGRAMMING’ FLOW CHART
- 1. LSH20 Control Panel Batteries:
- 2. LS14500 Peripheral Batteries: Excludes SE601 and SE651
- 3. Lithium Battery Storage:
- 4. Finding Manufacture Week and Year:
- 5. Event Log Ethernet Codes
- 6. Additional System Codes
- 7. Replacing Device and Control Panel batteries
- 8. Checking control panel firmware version

2012/1/9 Ed 1.1 Setup and Programming manual for XT-IP620 series
12 | Page
SERVER
ADDRESSES?
CODE/STATE
MODIFICATION?
SERVER
ADDRESSES?
CODE/STATE modification
These are the default transmitted events:
Device Event
Alert Event
Panel Reset Not Transmitted
Panel Batteries Event/Restore
AC Power Event/Restore
Phoneline Fault Not Transmitted
Tamper Event/Restore
Device Batt. Event/Restore
Radio Jamming Not Transmitted
Supervision Event/Restore
Periodic Test Event
Wrong Codes Not Transmitted
Duress Code Event
Alarm Memory Not Transmitted
Arm/Disarm Not Transmitted
Fire Event/Restore
Medical Assist Event
Ethernet Event/Restore
If you would like to change the state
press
YES/OK and use the or to toggle
between:
Alarm – Appearance
Alarm/End – Appearance and Restoral
Not Transmitted – Not Transmitted
TRANS. STATE
MODIFICATION
List of all
events
YES/OK
ESC/NO
ESC/NO
TRANS. STATE
MODIFICATION
YES/OK
ESC/NO
IP 1 ADDRESS
IP1 ADDRESS:
xxx.xxx.xxx.xxx
YES/OK
YES/OK
DOMAIN NAME 1
DOMAIN NAME 1:
xxxxx.xxx.xxx
YES/O
PORT 1
PORT 1:
xxx
YES/OK
YES/OK
YES/OK
ESC/NO
ESC/NO
Your IP1 address is given to you by your Central Station.
Press YES/OK to enter into the parameter and use the
Keypad to complete the address. Press
YES/OK to
confirm your entry and the
arrow to move to the next
parameter. *You will use either an IP address or a Domain
Name but not both
*When entering an IP address you must enter all 12 digits
including preceding zeros.
Your Domain Name is given to you by your Central Station.
Press YES/OK to enter into the parameter and use the
Keypad to complete the name. Press
YES/OK to
confirm your entry and the
arrow to move to the next
parameter. *You will use either an IP address or a Domain
Name but not both leave it blank if an IP has already been
The Port is given to you by your Central Station. By default
the panel will use 888. If you need to modify the port press
the
YES/OK key to enter into the parameter and the
keypad to complete the port. Press
YES/OK to confirm
and the arrow to move to the next parameter.
Continue through IP2 and TMT IP.
Once you have entered all valid parameters press ESC/NO
to return to the main menu then ESC/NO again to move to
the next parameter.
Your IP1 address is given to you by your Central Station.
Press YES/OK to enter into the parameter and use the
Keypad to complete the address. Press
YES/OK to
confirm your entry and the
arrow to move to the next
parameter. *You will use either an IP address or a Domain
Name but not both
*When entering an IP address you must enter all 12 digits
including preceding zeros.