
User's Manual
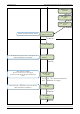
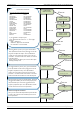
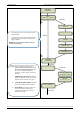
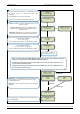
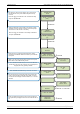
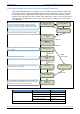
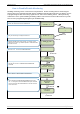
Table Of Contents
- Table of Contents
- Introduction:
- In order for an installation to be UL compliant you must follow the specifications in the table below:
- XT Initial Programming
- XT-IP620 Programming
- Device Installation
- Entering a Badge or Access Code for Arming/Disarming
- Configuration of Special Arming Modes:
- How to Disable/Enable Monitoring
- ETHERNET Parameters:
- How to test to the dispatch center
- How to Disable Monitoring
- How to test RF for deployment of devices
- XT-IP620 Power Chart
- Arming Input Wiring Diagram
- How to test to the dispatch center
- How to mount the XT-IP620
- Troubleshooting
- Monitoring Station is not getting ANY video but is getting signals:
- Monitoring Station is not getting any signals:
- Panel is staying CONNECTED WITH MONITOR STATION
- Unable to record device or getting ‘Pairing Failure’ error
- Outdoor MotionViewer Trips All the Time:
- XT-IP620 -SERIES ‘AFTER INITIAL PROGRAMMING’ FLOW CHART
- 1. LSH20 Control Panel Batteries:
- 2. LS14500 Peripheral Batteries: Excludes SE601 and SE651
- 3. Lithium Battery Storage:
- 4. Finding Manufacture Week and Year:
- 5. Event Log Ethernet Codes
- 6. Additional System Codes
- 7. Replacing Device and Control Panel batteries
- 8. Checking control panel firmware version

2012/1/9 Ed 1.1 Setup and Programming manual for XT-IP620 series
11 | Page
YES/OK
YES/OK
DATE (Minutes) :
10:53
CONNECTED TO
MONITOR.STATION?
ACCOUNT NUMBER?
ACCOUNT NUMBER:
99865123
PERIODIC TEST:
24 HOURS
Other periods are available:
24 hours, 12 hours,1 hour, 7 days No Test
Use arrows for the selection and press YES/OK to
confirm.
or
for period selection
and
YES/OK to apply
DATE (Day) :
13/11/05
YES/OK
YES/OK
YES/OK
Use the Alphanumeric Keypad to enter in a 4-8 digit account
number provided by the Central Station
TIME (HOUR) :
10:00
YES/OK
YOU MUST ALWAYS CHOOSE ‘YES/OK’
TEST HOUR:
00:00
TEST MINUTE:
00:00
Use the arrow keys +
YES/OK to choose the Hour and
Minute the periodic test will happen.
YES/OK