
Installation Instructions
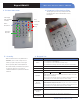

Keys Description
Panic
The panic request is launched in two steps:
1. 3 second press on the PANIC key
2. 1 second press on one of the three assistance keys
- The transmitted event type and siren activity depend on programming
OK
Used to confirm any data capture or acknowledge messages
ESC
Exits the current menu or cancels all data entered
CLR
Deletes the last character entered
Symbols
The symbols: 1 . _ @ $ , ‘ ? ! ; : “ ( =space) are accessed through the 1
key
• With multiple 1 second presses on the 1 key, the user is able to select the
symbol they are looking for.
• By pressing and holding the 1 key, the line with all symbols will show. Use
the arrow keys to select the symbol and press OK to confirm.
Special
Characters
Special Characters +0-*#=/%& ¥<>() are accessed through the 0 key
• With multiple 1 second presses on the 0 key the user is able to select the
special character they are looking for.
• By pressing and holding the 1 key, the line with all symbols will show. Use
the arrow keys to select the symbol and press OK to confirm.
Capital Letter
Press and hold appropriate letter key then repeat press
Auto-Repeat
mode
When a user holds an arrow key, the keypad will scroll all available values
Re-sync and
Enrollment
Press and release ESC/NO and CLR buttons simultaneously
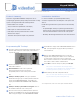
3. Product Overview
LCD display
with automatic
backlight
Arming
Keys
Red /
Green LED
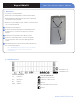
4. Removal of Protective Film
They keypad is protected by a transparent film.
It is important to remove this film before using
the keypad.
6. Keypad Use5. Security
- Remove batteries before any maintenance
- WARNING, there is a risk of explosion if a
battery is replaced by an incorrect type!
- Observe polarity when inserting batteries
- Do not throw away used batteries they must
be properly disposed of according to
Hazardous material regulations for Lithium
batteries
Menu
Navigation
Assistance
Requests
www.videofied.com
Keypad XMA611
INSTALLATION DATA SHEET