
User's Manual
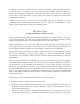


Table Of Contents
- TABLE OF CONTENTS
- Model R-122V Vacuum Tube Ribbon Microphone
- Introduction
- Active Ribbon Technology
- Description
- Applications
- Ribbons in the Digital World
- User Guide
- Using the R-122V vacuum tube Ribbon Microphone
- Power Supply Input Module
- Operation
- Amplification Considerations
- The Sweet Spot
- Finding and Working with the Sweet Spot
- Proximity Effect and Working Distance
- The Sound That Is “More Real than Real”
- Microphone Techniques
- General Tips for Using the Royer R-122V
- Stereophonic Microphone Techniques
- Specialized Recording Techniques
- Recording on the Back Side of the R-122V
- Care & Maintenance
- Troubleshooting
- Features
- Electrical Specifications
- Mechanical Specifications
- Polar Pattern
- Frequency Response
- Warranty

R-122V CABLE PINOUT
7-Pin XLR Function Specifics:
Pin 1 Ground
Pin 2 Signal Hot (+) (unbalanced)
Pin 3 No Connection (open)
Pin 4 High DC Plate Supply (approximately
Voltage 135-VDC)
Pin 5 Heater supply (6-Volts DC)
Pin 6 Ground
Pin 7 No Connection (open)
(See page 8 for complete instructions on changing fuses and voltage)
Caution!
Keep recorded tapes, spring-wound watches, and personal credit cards using magnetic coding
away from the microphone to prevent possible damage to them caused by the transducer’s
powerful magnets.
Troubleshooting
Most troubleshooting issues can be traced to some form of pilot error, so we'll cover the obvious
first. If the microphone produces no output whatsoever, establish that the cables are properly
connected and that none of the pins in the 7-pin cable-set are damaged, bent or missing. This also
applies to the 7-pin male connector at the bottom of the microphone. Make sure that the power
supply is connected and set to the proper voltage. The pilot light should illuminate when the
power switch is turned on. In addition a small ballast lamp located at the base of the microphone
should also glow dimly.
If the power supply fails to power up, check the fuse. The safety fuse should fail only if a
problem is present. If the power supply blows a fuse, check the cable set for damage. If none is
found, make sure the fuse is of the correct type. Make certain the power supply is set to the
correct voltage for your area. If the supply still refuses to power up, contact the factory.
If the supply and microphone indicate that power is being supplied properly but the mic still
produces no sound, make sure the preamplifier is working properly and that the 3-pin
20