
User's Manual
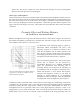


Table Of Contents
- TABLE OF CONTENTS
- Model R-122V Vacuum Tube Ribbon Microphone
- Introduction
- Active Ribbon Technology
- Description
- Applications
- Ribbons in the Digital World
- User Guide
- Using the R-122V vacuum tube Ribbon Microphone
- Power Supply Input Module
- Operation
- Amplification Considerations
- The Sweet Spot
- Finding and Working with the Sweet Spot
- Proximity Effect and Working Distance
- The Sound That Is “More Real than Real”
- Microphone Techniques
- General Tips for Using the Royer R-122V
- Stereophonic Microphone Techniques
- Specialized Recording Techniques
- Recording on the Back Side of the R-122V
- Care & Maintenance
- Troubleshooting
- Features
- Electrical Specifications
- Mechanical Specifications
- Polar Pattern
- Frequency Response
- Warranty

sound. Basically, what you hear at the amp is what you get in the control room and in your
recordings.
Choirs and Orchestras can be picked up well using a pair of R-122V's. Place the microphones
at a height of ten feet or so and a few feet behind the conductor. The microphones should be
spaced apart approximately one foot and angled, one toward the left and one toward the right, or
in the classic Blumlein configuration.
Drums and Percussion instruments sound full-bodied and natural when recorded with a pair of
R-122Vs. For a drum set, placing the microphone(s) at a distance of four to six feet above the kit
works very well without making the cymbals sound splattered. A kick drum should be miked at a
distance of at least 18 inches and possibly used in conjunction with a pop filter to prevent
excessive ribbon movement. If the front head has a hole cut in it, position the microphone away
from the hole to avoid excessive air blasts. An R-122V used as a mono room mic, four to six feet
in front of the kit and compressed, will yield a surprisingly large, full drum sound.
For closer miking of a kick drum (10 to 18 inches), the microphone should be leaned forward at
a 45-degree angle to protect the ribbon element from excessive plosive forces (See Example 3).
This microphone position also provides good kick drum isolation because the top of the
microphone, which does not pick up sound, is aimed at the rest of drum kit.
Recording Loud or Plosive Sounds
With all ribbon microphones, wind is the enemy! Air movement is far more damaging to ribbon
microphones than high SPL’s. Some sound sources can generate powerful blasts of air that
should be avoided. Kick drums and electric guitar and bass cabinets are typical examples of
sound sources that can produce harmful air currents. One way to determine if the air pressure is
excessive is to place your hand in front of the sound source (the kick drum, the guitar cab, etc.)
and see if you can feel actual air movement. If you feel air movement, do not put your ribbon
microphone there.
A simple technique that can avert damage due to over-stressing the ribbon is as follows: After
choosing the optimum placement for the microphone, slightly angle the microphone in such a
way that the percussive wave is not directed head on at the front of the mic. Often, a slight
angular tilt (either vertically or horizontally) is all that is required to prevent harm to the ribbon
(see examples 1, 2 and 4). It should be noted that as the microphone is tilted vertically, relative to
the sound source, the highs will begin to roll off.
1. Example of the Vertical Positioning
Technique
Slight off-axis positioning will minimize stressing
the ribbon on loud sound sources
14