Royer Labs Model R-122V Vacuum Tube Ribbon Velocity Microphone Operation Instructions Manual & User Guide Made in U.S.A.
TABLE OF CONTENTS Model R-122V Vacuum Tube Ribbon Microphone Revised 2019 TABLE OF CONTENTS 2 Model R-122V Vacuum Tube Ribbon Microphone 2 Introduction Active Ribbon Technology 3 3 Description Applications 5 5 Ribbons in the Digital World User Guide 5 6 Using the R-122V vacuum tube Ribbon Microphone 6 Power Supply Input Module 7 Operation 8 Amplification Considerations 9 The Sweet Spot 11 Finding and Working with the Sweet Spot 11 Proximity Effect and Working Distance 12 The Sound T
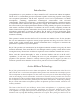
Introduction Congratulations on your purchase of a Royer model R-122V vacuum tube ribbon microphone. The R-122V is a handcrafted precision instrument capable of delivering superior sound quality and exceptional performance. The R-122V represents a new level of performance for ribbon microphones, combining sophisticated technological advancements with old-world craftsmanship.
output level comparable to that of condenser microphones, and its buffer stage provides a low impedance output while presenting a perfect impedance load to the ribbon element. Nonpowered ribbon microphones suffer substantially degraded frequency response and lowered sensitivity when they are paired to a preamp with too low of an input impedance.
Description The R-122V is a compact, active, bi-directional (figure-eight) velocity type tube ribbon microphone designed for professional applications. The figure-eight pickup pattern allows the R-122V to be addressed from either side with equal sensitivity. The in-phase signal is achieved when the microphone is addressed from the front, indicated by the “ROYER” logo. The R-122V is reasonably tolerant of shock and vibration, and performance is unaffected by changes in temperature or humidity.
User Guide Using the R-122V vacuum tube Ribbon Microphone The head amplification system used in the R-122V consists of a sub-miniature military grade vacuum tube configured as a cathode follower. This circuit arrangement offers ideal impedance matching properties and very high headroom. The vacuum tube is powered from a dedicated power supply that supplies high voltage B+ and heater current through the microphone cable.
extending the life of the tube. We recommend letting the R-122V warm up for at least 15 minutes prior to use. When the microphone becomes operational, bring the channel fader to 0-dB (unity) and use the trim to set the desired level. This technique maximizes the signal-tonoise performance of the preamplifier or console input channel. 5. When disconnecting the microphone, bring the channel fader down, turn the R122V's power supply OFF and unplug the microphone cable from the power supply. 6.
Never attempt to bypass a fuse or use one of a higher rating! Not only is this an unsafe practice, but it will void the factory warranty. Voltage Changeover The power supply can be set to operate from voltages ranging from 100 to 240 volts AC. For 230V operation, use the 240V setting. A small window at the rear of the Input Power Module will display the current voltage setting. To change operation to a different AC voltage requires repositioning a selector drum within the module.
Several performers can be grouped at both the front and back of the microphone, with one proviso: since the outputs are out of phase at the front and back of the microphone, cancellation can result if, for example, two tenors are placed at opposite sides at equal distances and they are singing in unison, so listen to the feed before committing to it. 3.
but remember that you get what you pay for. If you have the opportunity to audition one or more preamplifiers before you buy one, do so. Microphones and preamplifiers work together like a team and some are better matches than others. The R-122V vacuum tube ribbon microphone is capable of substantial output signal, especially if used in conjunction with very loud signal sources such as guitar amplifiers.
microphone away from it. Another trick is to alter the orientation of the microphone in such a way that the noise is cancelled out. If you ever experience this situation while in the studio, try rotating the microphone to identify the “null” point, and then reposition the mic and the sound source. This is much like having a guitar player with single coil pickups turn around until amplifier hum disappears.
square law. The inverse square law states that for each halving of source-to-microphone distance, the sound pressure level quadruples. Other Types of Microphones For the same ratio of direct to reverberant sound, omni-directional microphones must be closer to the sound source than cardioid or bi-directional microphones. Microphones should generally face the sound source head-on; if not, treble losses due to phase cancellation can result.
such sound sources can deliver a “better than real” sound, since the boosted bass response will compensate for the weak fundamentals in the sound source. Since the fundamentals are present, but weakened, boosting them by several dB will sound natural, even though the sound has been sweetened. Radio and television announcers have long relied on proximity effect to give a full, rich, authoritative quality to their voices.
sound. Basically, what you hear at the amp is what you get in the control room and in your recordings. Choirs and Orchestras can be picked up well using a pair of R-122V's. Place the microphones at a height of ten feet or so and a few feet behind the conductor. The microphones should be spaced apart approximately one foot and angled, one toward the left and one toward the right, or in the classic Blumlein configuration.
2. Example of Horizontal PositionTechnique Angling the microphone slightly will minimize stressing the ribbon. Due to the microphone’s pick-up pattern, sound will not be affected 3. Side View of Kick Drum miking Technique A) Close miking - angle mic so that pressure wave iss off-axis B) Standard miking position 4.
Stereophonic Microphone Techniques Classic Blumlein Technique For many years, several “coincident” microphone setups have been widely used for picking up sounds in stereo as naturally as possible. Figure 1 Classic Blumlein or coincident miking technique The “Blumlein” technique, named for A.D. Blumlein of England, involves the use of two figureeight microphones positioned as in the sketch (see Figure 1), so that one faces left and the other right, at an angle of 90 degrees (i.e.
If the outputs of the two microphones are equal (or made equal using gain controls), the stereo pickup will be similar to that of two microphones placed as a Blumlein X-Y pair, delivering a wide stereo image. As you reduce the level of the “side” microphone, the width of the stereo image will narrow until, with the side microphone turned all the way down, you have just the “mid” mic panned center for a mono pickup.
Figure 3 Typical M-S connection set-up figure-8 microphone, the front side of the R-122V is in-phase and the back side is out-of-phase. We suggest that you reverse the phase polarity on your microphone preamplifier to achieve inphase recordings when tracking on the back side of an R-122V. Normal proximity effect (increase of bass), which is prevalent on the R-122V and all ribbon microphones, starts to occur normally at 4-6 feet from the microphone and increases with closeness.
2. Do not expose the microphone to direct blasts of air or strong air currents! Use a windscreen or suitable pop filter when close miking a vocalist or certain types of wind instruments. Ppopping does not necessarily damage the ribbon element but may produce unacceptable preamplifier overload and could cause damage to speaker systems. 3. Do not expose the microphone to liquids or caustic smoke. 4.
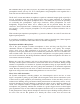
R-122V CABLE PINOUT 7-Pin XLR Function Specifics: Pin 1 Ground Pin 2 Signal Hot (+) (unbalanced) Pin 3 No Connection (open) Pin 4 High DC Plate Supply (approximately Voltage 135-VDC) Pin 5 Heater supply (6-Volts DC) Pin 6 Ground Pin 7 No Connection (open) (See page 8 for complete instructions on changing fuses and voltage) Caution! Keep recorded tapes, spring-wound watches, and personal credit cards using magnetic coding away from the microphone to prevent possible damage to them caus
microphone cable is in good working order. Use another microphone to establish that the signal path is indeed working. If this fails to resolve the problem, contact the factory. If the mic works but is noisy or has low output, there could be a problem with the ribbon element or the vacuum tube. In either case, the microphone is not user serviceable and repairs should be directed to an authorized service center.
Output Connector: Male XLR 3 pin (pin 2 hot) Vacuum Tube: 5840-W miniature type with wire leads Power Requirements: 100-120 VAC 50-60HZ, 220-240 VAC 50-60HZ Fuse Type (2 Slo-Blo): Located in IEC power connector 200-ma for 110-120 volts, 100-ma for 220-240-volts All Royer monaural microphones are also available in matched pairs. Mechanical Specifications High-grade Neodymium magnet assembly in Royer’s patented Flux-Frame 1.5” x 3/16” x 2.
Polar Pattern Frequency Response To learn more about Royer products and their usage, visit our website at www.royerlabs.com.
Warranty PLEASE RETAIN YOUR ORIGINAL BILL OF SALE AS YOU WILL NEED TO PRESENT IT SHOULD YOU REQUIRE SERVICE UNDER THIS WARRANTY. TO VALIDATE THIS WARRANTY, THE REGISTRATION CARD AND A PHOTOCOPY OF THE SALES RECEIPT FROM AN AUTHORIZED ROYER DEALER MUST BE ON FILE WITH ROYER LABS. Royer Labs hereby warrants all Royer R-series microphones with the following terms and conditions.