
User Manual
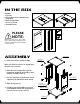


IN THE BOX
Included:
a. Top Plate
b. Bottom Plate w/ Pre-installed Casters
c. Side Panels
d. Vertical Support Bars
e. Accessory Screws
f. Assembly Screws
ASSEMBLY
Lock the casters before starting assembly.
Make sure all knock-out holes are aligned along
the back side of your rack.
1. Attach the vertical support bars (d) to the
bottom plate (b) with the pre-installed casters
using the assembly screws (f).
2. Place the side panels (c) between the vertical
support bars (d) and attach from the bottom.
3. Attach the top plate (a).
4. Customize your rack by adding accessories
(sold separately) that fit your components. Be
sure to use the accessory screws (e).
a.
d.c. e.
f.
b.
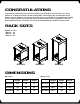
Maximum load capacity for these racks is 600lbs.
Using a combined equipment weight that is heavier
than the max load indicated may result in instability
causing possible injury.
PLEASE
NOTE:
Bottom Plate
Casters
Assembly
Screws
Vertical
Support Bars
Top Plate
Side Panels