
Deployment Guide

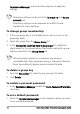

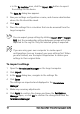

Table Of Contents
- Roxio Secure Burn Enterprise Deployment Guide
- Installing Roxio Secure Burn Enterprise from the command prompt
- Using the registry
- Using the Permissions Manager
- To launch the Permissions Manager
- To enter a new group or change a group key
- To set read and write permissions by machine
- To change group membership
- To delete a group key
- To enable a personal password
- To set a default password
- To enable logging
- To enable burning of non-encrypted discs
- To export settings
- To import settings
- System requirements
- Contact information

Roxio Secure Burn Enterprise Deployment Guide 15
To enter a new group or change a group key
1 Do one of the following:
• To create a new group, click New. A new group and group key
(a GUID) is
created automatically.
• To change Group Key or Group Name, click an existing group
name or group key and edit the highlighted information.
A group key can be any combination of letters and numbers up to
40 characters in length.
2 Click Apply to confirm the change and leave the Permissions
Manager open, or click OK to confirm the change and clo
se the
Permissions Manager.
The group name is a helpful way to keep track of groups if your
group keys are intentionally set to prevent replication by end
users. Follow the steps described above to create group names
for each group key.
To set read and write permissions by machine
1In the By machine area, choose from the following settings:
• Enable the Read permission check box to make discs or USBs
r
eadable (including by third-party software). To limit the read
permission to data encrypted by Roxio Secure Burn, enable the
Access only the data encrypted with Roxio Secure Burn.
• Enable the Write permission check box to permit disc and USB
a
uthoring/writing and reading (including by third-party
software). To limit permission to Roxio Secure Burn only (no
third-party software), enable the Write with Roxio Secure Burn
on
ly.
2 Click Apply to confirm the change and leave the Permissions
Manager open, or click OK to confirm the change, close the