103907383-02 GS6030 US_GS6010 27/11/14 11:44 Page1 GARMENT STEAMER GS6030 EN Instruction for use Instructivo de operación Groupe SEB USA 2121 Eden Road Millville, NJ 08332 USA - Tel: 1-800-769-3682 Groupe.S.E.B. México, S.A. DE C.V. Goldsmith 38 Desp. 401, Col. Polanco Delegación Miguel Hildalgo 11 560 México D.F. RFC GSM8211123P5 ES www.rowenta.
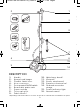
1103907383-02 GS6030 US_GS6010 27/11/14 11:44 Page2 1 2 9* 3 13* 10* W f 8 11* 12* w 16* 7 6 15 4 t w w 5 14 DESCRIPTION 1. 2. 3. 4. 5. 6. 7. 8. 9. 10. 11. 12. 13. 14. Handle Steam head hanger Flexible fabric hose Hose connector Foot operated On/Off switch Removable water tank Power cord clip Telescopic pole Fabric brush * Upholstery brush* Lint pad* Crease attachment* Curtain rod extension* On board accessories storage 15. Power indicator light 16.
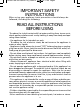
1103907383-02 GS6030 US_GS6010 27/11/14 11:44 Page3 IMPORTANT SAFETY INSTRUCTIONS When using your appliance, basic precautions should always be followed, including the following: READ ALL INSTRUCTIONS BEFORE USING -To reduce the risk of contact with hot water emitting from steam vents, check appliance before each use by holding it away from body and operating steam button. - Use appliance for its intended use only.
1103907383-02 GS6030 US_GS6010 27/11/14 11:44 Page4 Use care when you empty a steam appliance, there may be hot water in the tank. - Pour water in water tank only. - Never drop or insert any object into any opening or hose. - Always keep the hose and nozzle elevated above the water tank. - Steam only in an up and down vertical motion. Never use steamer in a horizontal position or tilt into a backward position, this may result in hot water discharge.
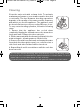
1103907383-02 GS6030 US_GS6010 27/11/14 11:44 Page5 Assembly : Preparation: • Place the base on the floor and remove the water tank. Install pole in main unit: • Insert the pole according to the diagram to the right, ensuring the marks on the unit and the pole line up. • Press pole firmly into place. Locking the pole : • Lay the base on its side with the inserted pole. •Turn the lockbar located on the bottom of the base 90° to secure the pole. Use a coin or similar object to turn the lockbar.
1103907383-02 GS6030 US_GS6010 27/11/14 11:44 Page6 Filling the water tank • The steamer is designed to be used with TAP WATER . If the water in your area is hard, Rowenta recommends that you mix half tap water and half distilled water, which reduces the hardness or just use inexpensive bottled spring water. IMPORTANT Never use water that contains additives (starch, perfume, aromatic substances, softener, etc) in the steamer.
1103907383-02 GS6030 US_GS6010 27/11/14 11:44 Page7 Use Warning: Never steam a garment while it is being worn. The hose and steam head may become hot during use. This is perfectly normal. Be careful and avoid any prolonged contact. • Only operate the steamer on the floor clear of any materials which may obstruct the base of the steamer (flat and horizontal surface). Do not obstruct the openings on the lower part of the appliance.
1103907383-02 GS6030 US_GS6010 27/11/14 11:44 Page8 Accessories (depending on model) Before using an accessory, check the manufacturer recommendations. It is also recommend that you carry out a test on part of the fabric which cannot be seen. Crease attachment* • Gently push the crease attachment into place on the steam head. • Push on the handle to open the crease attachment. • Place the garment between the crease attachment and steam head. • Release the handle.
1103907383-02 GS6030 US_GS6010 27/11/14 11:44 Page9 We recommend cleaning the pad on an old cloth that can be discarded. • We recommend to use the lint pad before steaming your clothes for perfect results. Delicates steam cap* The steam cap cannot be used together with the fabric brush on the steam head. Be sure unit is unplugged and completely cool before attaching accesories. The steam cap provides even distribution of steam, filters impurities from the water and protects fabrics from water dripping.
1103907383-02 GS6030 US_GS6010 27/11/14 11:44 Page10 Cleaning Clean the main unit with a damp cloth. To maintain maximum performance, your steamer must be descaled occasionally. The time between descaling operations depends on the quality of the water and the frequency with which you use the appliance. The appliance must be descaled at least once a year or after 50 hours of use. To carry out a descaling operation, follow the following steps: 1. Ensure that the appliance has cooled down completely.
03907383-02 GS6030 US_GS6010 27/11/14 11:44 Page11 Troubleshooting PROBLEMS Possible causes Solutions There is no steam. The appliance has not been turned on. The steam flow is low. Check that your appliance is properly plugged in and press the On / Off button (on the front of the appliance). The power light should turn on. The hose has been obstructed. Check that the hose is not bent or twisted. There is no water left. Turn off the appliance and refill the water tank.
1103907383-02 GS6030 US_GS6010 27/11/14 11:44 Page12 ÊUÊ,"7 / Ê / , / " Ê / Ê 1 , / : www.rowenta.
1103907383-02 GS6030 US_GS6010 27/11/14 11:44 Page13 1 2 3 9* 16* 10* 8 11* 12* 13* 7 6 15 4 5 14 DESCRIPCIÓN l y y 1. 2. 3. 4. 5. 6. 7. 8. Cabezal de vapor Colgador del cabezal Tubo flexible Conector del tubo Interruptor accionado por el pie Depósito de agua desmontable Abrazadera del cable Brazo telescópico 9. 10. 11. 12. 13. 14. 15. 16.
1103907383-02 GS6030 US_GS6010 27/11/14 11:44 Page14 INSTRUCCIONES MPORTANTES DE SEGURIDAD Durante el uso de este electrodoméstico, deberán seguirse siempre unas precauciones básicas, entre ellas las que se indican a continuación : LEA TODAS LAS INSTRUCCIONES ANTES DE UTILIZAR ESTE APARATO - Para reducir el riesgo de contacto con el agua caliente expulsada por los orificios del vapor, compruebe el aparato antes de cada uso sujetándolo apartado del cuerpo y presionando el botón del vapor.
1103907383-02 GS6030 US_GS6010 27/11/14 11:44 Page15 mentales o su falta de experiencia y conocimientos puedan impedir el uso del aparato con seguridad sin la vigilancia o las instrucciones de una persona responsable que garantice que pueden utilizar el aparato con seguridad. - Los niños deberán ser vigilados por la persona responsable para asegurarse de que no jueguen con el aparato. - Podrían producirse quemaduras al tocar partes metálicas calientes, agua caliente o vapor.
1103907383-02 GS6030 US_GS6010 27/11/14 11:44 Page16 absolutamente necesario, deberá utilizarse un cable con una intensidad nominal de 15 A. Cables con una intensidad nominal inferior podrían sobrecalentarse. Se adoptarán las debidas precauciones para extender el cable de modo que nadie pueda darle un tirón o tropezar con él y caerse. GUARDE ESTAS INSTRUCCIONES ¡LA PROTECCIÓN DEL MEDIO AMBIENTE ES LO PRIMERO! Su aparato contiene materiales valorizables o reciclables.
1103907383-02 GS6030 US_GS6010 27/11/14 11:44 Page17 Colocación de la percha integrada: •Coja la percha con los ganchos para sujetar el cepillo mirando hacia fuera •Para orientarla correctamente, haga coincidir las marcas de alineación. •Introduzca el extremo de la percha en la conexión del brazo y presiónelo contra el brazo hasta que la percha quede correctamente encajada. •Si fuese necesario desmontar el brazo de la unidad principal, primero incline el aparato y desbloquee el brazo.
1103907383-02 GS6030 US_GS6010 27/11/14 11:44 Page18 IMPORTANTE No utilice nunca agua que contenga aditivos (almidón, perfume, sustancias aromáticas, suavizantes, etc.) para la plancha vertical a vapor. Aditivos como los mencionados pueden afectar a las propiedades del vapor y provocar la formación de depósitos sólidos. • Asegúrese de que el aparato está desenchufado. Saque el depósito de agua de la base del aparato tirando de él hacia arriba. Desatornille la tapa y llene el depósito.
1103907383-02 GS6030 US_GS6010 27/11/14 11:44 Page19 Uso Advertencia: No planche nunca una prenda llevándola puesta. El tubo flexible y el cabezal de vapor pueden calentarse durante el planchado. Esto es totalmente normal. Extreme las precauciones y evite un contacto prolongado. • Utilice la plancha vertical a vapor solamente sobre un suelo (plano y horizontal) despejado de cualquier objeto que pueda obstruir la base del aparato. No obstruya los orificios de la parte inferior del aparato.
1103907383-02 GS6030 US_GS6010 27/11/14 11:44 Page20 Accesorios (según el modelo) Antes de utilizar un accesorio, compruebe las instrucciones del fabricante. También es aconsejable realizar una prueba sobre una parte del tejido que no esté a la vista. Accesorio para arrugas* • Colóquelo con suavidad en posición. • Presione la empuñadura para abrir el accesorio para arrugas. • Sitúe la prenda entre el accesorio para arrugas y el cabezal de vapor. • Suelte la empuñadura.
1103907383-02 GS6030 US_GS6010 27/11/14 11:44 Page21 Recogedor de pelusa* El recogedor de pelusa es un accesorio aparte y no se puede sujetar al cabezal de vapor. El recogedor de pelusa se puede usar independientemente de la central vertical a vapor. El recogedor de pelusa recoge pelos, hilachas y pelaje de animales, permitiendo obtener un acabado profesional. • Para utilizar el recogedor de pelusa, cepille lentamente la prenda por la fibra o la lanilla del tejido.
1103907383-02 GS6030 US_GS6010 27/11/14 11:44 Page22 Después del uso • Después de utilizar la plancha vertical a vapor, apague el interruptor (el piloto indicador se apagará) y desenchufe el aparato. • Cuelgue el cabezal de vapor en posición vertical en los ganchos de la percha cuando no lo esté utilizando. • Enrollar el cable alrededor de los guardacables. • Vacíe el depósito de agua . • No transporte la central vertical a vapor tomándola por el asa del depósito de agua.
1103907383-02 GS6030 US_GS6010 27/11/14 11:44 Page23 El aparato se debe desincrustar al menos una vez al año o después de 50 horas de uso. Para llevar a cabo la desincrustación de la plancha, siga los pasos que se indican a continuación: 1. Asegúrese de que el aparato esté totalmente frío. Desenchufe el aparato y desconecte el tubo de vapor de la unidad principal. Pliegue el brazo telescópico. 2. Llene el depósito de agua dulce y vuelva a colocarlo en la unidad principal.
1103907383-02 GS6030 US_GS6010 27/11/14 11:44 Page24 Localización de averías PROBLEMAS Causas posibles Soluciones No hay vapor. Compruebe que el aparato está correctamente enchufado y encienda el interruptor ON/OFF (en la parte frontal del aparato). El piloto indicador deberá encenderse. El aparato no está encendido. El tubo flexible está obs- Compruebe que el tubo flexible no está truido. doblado ni retorcido. El flujo de vapor es bajo Sale agua por los orificios del cepillo de vapor.
1103907383-02 GS6030 US_GS6010 27/11/14 11:44 Page25 -ÊUÊ,"7 / Ê , / Ê / Ê / , " ÊÊÊÊÊÊÊ : www.rowenta.
1103907383-02 GS6030 US_GS6010 27/11/14 11:44 Page28 1103907383/02 - 48/14 - GS6030