103909885DW9220DW9225D1_110x220mm26/02/1308:57Page1 1103909885 - 08/13
1103909885DW9220DW9225D1_110x220mm26/02/1308:57Page2 EN 2 DW9220 - DW9225 FR 3 DE NL IT 9 1 ES PT 11 EL HIG SV NO FI DA AR www.rowenta.
1103909885DW9220DW9225D1_110x220mm26/02/1308:57Page3 EN 2 1* FR 3 DE 4 5 NL 6 7 IT 9 8 10 ES PT 11 12 EL 13 14 15 HIGH PRECISION TIP SV NO FI DA AR (*) Depending on model - Selon modèle - je nach Modell - al naar gelang het model - A seconda del modello - Según el modelo - Consoante o modelo - ανάλογα με το μοντέλο - beroende på modell avhengig av modell - mallista riippuen - afhængig af model - q¥œuL∞« Vº• EN.............................5 FR ...........................11 DE..........
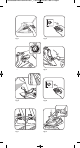
1103909885DW9220DW9225D1_110x220mm26/02/1308:57Page4 fig.1 fig.2 fig.3 fig.4 fig.5 fig.6 fig.7 fig.
1103909885DW9220DW9225D1_110x220mm26/02/1308:57Page5 fig.9 fig.10 fig.11 fig.12 1 min. fig.13-a fig.14 fig.
1103909885DW9220DW9225D1_110x220mm26/02/1308:57Page1 SAFETY INSTRUCTIONS • Please read these instructions carefully and keep them for further references. • Never leave the appliance unattended when it is connected to a power source; if it has not cooled down for approximately 1 hour. • The iron must be used and rested on a flat, stable, heat-resistant surface. • When you place the iron on the iron rest, make sure that the surface on which you place it is stable.
1103909885DW9220DW9225D1_110x220mm26/02/1308:57Page2 IMPORTANT RECOMMANDATIONS • The voltage of your electrical installation must correspond to that of the iron (220-240V). Always plug your iron into an earth socket. Connecting to the wrong voltage may cause irreversible damage to the iron and will invalidate the guarantee. • If you are using a mains extension lead, ensure that it is corrected rated (16A) with an earth, and is fully extended.
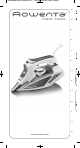
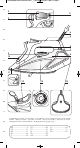
1103909885DW9220DW9225D1_110x220mm26/02/1308:57Page3 DESCRIPTION 1. 2. 3. 4. 5. 6. 7. 8. EN 9. Self clean button 10. Spray 11. High precision tip 12. Soleplate 13. Filling inlet 14. Temperature control dial 15. Rear Cover Auto off* Shot of steam button Steam ON / Steam OFF Cord Handle Spray trigger Thermostat control light Water tank STEAMFORCE, CONCENTRATED INNOVATION… Small in size , Steamforce combines power and performance thanks to the compact steam generator built inside the iron.
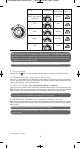
1103909885DW9220DW9225D1_110x220mm26/02/1308:57Page4 FABRIC THERMOSTAT THERMOSTAT IRONING INDICATION LABEL Nylon (Synthetic fibres, e.g. viscose, polyester) NYLON silk SILK wool WOOL cotton COTTON linen LINEN IMPORTANT The iron takes longer to cool down than to heat up. We recommend that you start with fabrics to be ironed at a low temperature. For mixed fabrics set the temperature for the most delicate fabric.
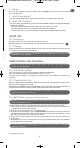
1103909885DW9220DW9225D1_110x220mm26/02/1308:57Page5 7 • Spray EN Press the spray button to moisten difficult creases fig.10. You can use the spray function at any temperature. 8 • Anti-Drip system * It prevents water dripping out of the soleplate when the temperature is too low. 9 • Auto Off function* • For your safety, the electronic system cuts off the power and the auto off indicator light flashes fig.
03909885DW9220DW9225D1_110x220mm26/02/1308:57Page6 PROBLEMS Problem Cause Solution The iron is plugged in, but the soleplate of the iron remains cold. No mains supply. Check that the mains plug is properly inserted or try plugging the iron into a different socket. Temperature control set too low. Set the temperature control to a higher temperature. The automatic electronic shut off is active.* Move your iron. Thermostat control light goes on and off This is normal.
1103909885DW9220DW9225D1_110x220mm26/02/1308:57Page7 CONSIGNES DE SÉCURITÉ • Merci de lire attentivement ces consignes et FR de les conserver. • Ne laissez jamais l’appareil sans surveillance lorsqu’il est raccordé à l’alimentation électrique ; tant qu’il n’a pas refroidi environ 1 heure. • Le fer doit être utilisé et posé sur une surface plane, stable et résistante à la chaleur. • Lorsque vous posez le fer sur le repose-fer, assurez-vous que la surface sur laquelle vous le posez est stable.
1103909885DW9220DW9225D1_110x220mm26/02/1308:57Page8 RECOMMANDATIONS IMPORTANTES • La tension de votre installation électrique doit correspondre à celle du fer (220-240 V). Ce fer doit être toujours branché sur une prise de courant avec terre. Toute erreur de branchement peut endommager le fer de manière irréversible et annulera la garantie. • Si vous utilisez une rallonge, vérifiez qu’elle est de type bipolaire (16 A) avec conducteur de terre, et qu'elle est entièrement dépliée.
1103909885DW9220DW9225D1_110x220mm26/02/1308:57Page9 DESCRIPTION 1. 2. 3. 4. 5. 6. 7. 8. Arrêt automatique* Commande du jet de vapeur Vapeur activée / Vapeur désactivée Cordon d’alimentation Poignée Commande du spray Voyant de contrôle du thermostat Réservoir d’eau 9. Commande d’auto-nettoyage 10. Spray FR 11. Pointe haute précision 12. Semelle 13. Orifice de remplissage 14. Thermostat 15.
1103909885DW9220DW9225D1_110x220mm26/02/1308:58Page10 TISSU THERMOSTAT INDICATIONS SYMBOLE DU DE THERMOSTAT REPASSAGE Nylon (fibres synthétiques : viscose, polyester, etc.) NYLON soie SILK laine WOOL coton COTTON lin LINEN IMPORTANT Le temps de refroidissement du fer est plus long que le temps de chauffe. Nous vous recommandons de commencer votre repassage par les tissus délicats à la température minimale.
1103909885DW9220DW9225D1_110x220mm26/02/1308:58Page11 8 • Système anti-gouttes * Elle permet d’éviter que de l'eau s'écoule de la semelle lorsque la température est trop basse. 9 • Fonction Auto Off * • Pour votre sécurité, le système électronique coupe l’alimentation et le voyant autostop clignote fig.
1103909885DW9220DW9225D1_110x220mm26/02/1308:58Page12 PROBLÈMES POSSIBLES Problème Cause Le fer est branché, mais la semelle reste froide ou ne chauffe pas. Solution Pas d’alimentation de courant. Contrôlez si la fiche est bien insérée dans la prise ou essayez de brancher l’appareil sur une autre prise. Réglage de la température trop basse. Placez le thermostat sur la position souhaitée. L’arrêt électronique automatique* est activé. Bougez votre fer. Le voyant de contrôle s’allume et s’éteint.
1103909885DW9220DW9225D1_110x220mm26/02/1308:58Page13 n u . FÜR IHRE SICHERHEIT • Bitte lesen Sie diese Gebrauchsanweisung aufmerksam durch und heben Sie sie auf. • Lassen Sie das Gerät nie unbeaufsichtigt, wenn es am Stromnetz angeschlossen ist und solange DE es nicht abgekühlt ist (etwa eine Stunde). • Verwenden Sie Ihr Bügeleisen nur auf einer stabilen Arbeitsfläche. • Vergewissern Sie sich, wenn Sie das Bügeleisen auf seine Abstellfläche stellen, dass die Fläche, auf die Sie es stellen, stabil ist.
1103909885DW9220DW9225D1_110x220mm26/02/1308:58Page14 WICHTIGE HINWEISE • Die Spannung Ihrer Elektroinstallation muss der Spannung des Bügeleisen (220 - 240 V) entsprechen. Das Bügeleisen muss unbedingt an einer geerdeten Steckdose angeschlossen werden. Ein fehlerhafter Anschluss kann zu irreparablen Schäden am Bügeleisen führen und setzt die Garantie außer Kraft.
1103909885DW9220DW9225D1_110x220mm26/02/1308:58Page15 BESCHREIBUNG 1. 2. 3. 4. 5. 6. 7. 8. Auto- off Anzeige* Dampfstoßtaste Dampf EIN / Dampf AUS Stromkabel Griff Spraytaste Thermostat-Kontrollleuchte Wassertank 9. Self Clean-Taste 10. Spray 11. Spitze zum besonders präzisen Bügeln 12. Bügelsohle 13. Einfüllstutzen 14. Temperaturregler 15. Abstellfläche STEAMFORCE, KONZENTRIERTE INNOVATION... Dank des kompakten Dampferzeugers vereint das relativ kleine Bügeleisen Steamforce Kraft und Leistung.
1103909885DW9220DW9225D1_110x220mm26/02/1308:58Page16 TEMPERATUR THERMOSTAT BÜGELZ REGLER ANZEIGE EICHEN STOFFART Nylon (Synthetikfasern, z. B. Viskose, Polyester) NYLON Seide SILK Wolle WOOL Baumwolle COTTON Leinen LINEN WICHTIG! Das Bügeleisen braucht mehr Zeit zum Abkühlen als zum Aufheizen. Es wird empfohlen, mit den empfindlicheren Stoffen bei niedriger Temperatur zu beginnen. Wenn Sie Mischgewebe bügeln, stellen Sie die Bügeltemperatur auf die empfindlichste Faser ein.
1103909885DW9220DW9225D1_110x220mm26/02/1308:58Page17 8 • Anti-Tropf-System* Dieses System verhindert, dass bei zu geringer Temperatur Wasser aus der Bügelsohle heraustropft. 9 • Elektronische automatische Abschaltung* • Zu Ihrer eigenen Sicherheit schaltet das elektronische System die Stromversorgung aus und das Autostop Lämpchen leuchtet auf fig.
1103909885DW9220DW9225D1_110x220mm26/02/1308:58Page18 MÖGLICHE STÖRUNGEN UND DEREN BEHEBUNG Störung Mögliche Ursache Das Bügeleisen ist angeschlossen, aber die Sohle bleibt kalt und heizt sich nicht auf. Das TemperaturKontrolllämpchen geht an und aus. Lösung Keine Stromversorgung. Vergewissern Sie sich, dass der Stecker richtig in der Steckdose steckt oder schließen Sie das Gerät an einer anderen Steckdose an. Zu niedrige Temperatureinstellung.
1103909885DW9220DW9225D1_110x220mm26/02/1308:58Page19 VEILIGHEIDSVOORSCHRIFTEN • Lees deze instructies zorgvuldig en bewaar ze zodat u ze in de toekomst kunt raadplegen. • Laat het apparaat nooit zonder toezicht wanneer het aangesloten is op het netwerk; als het niet eerst heeft afgekoeld gedurende NL ongeveer 1 uur. • U dient het strijkijzer te gebruiken op een vlak, stabiel en warmtebestendig oppervlak.
1103909885DW9220DW9225D1_110x220mm26/02/1308:58Page20 • De oppervlakken waarop dit teken staat en het strijkoppervlak zijn zeer heet wanneer het apparaat wordt gebruikt. Raak deze oppervlakken niet aan voordat het strijkijzer is afgekoeld. BELANGRIJKE AANBEVELINGEN • De netspanning van uw elektrische installatie moet overeenstemmen met die van het strijkijzer (220-240V). Sluit uw strijkijzer altijd aan op een stopcontact met aarding.
1103909885DW9220DW9225D1_110x220mm26/02/1308:58Page21 BESCHRIJVING VAN HET APPARAAT 9. Zelfreinigingknop 10. Spray 11. Strijkpunt 12. Strijkzool 13. Vulopening 14. Temperatuur draaiknop 15. Achterkant strijkijzer 1. Auto-off controlelampje* 2. Knop voor extra stoomstoot 3. Stoom AAN / Stoom UIT 4. Snoer 5. Handgreep 6. Sproeiknop 7. Controlelampje thermostaat 8. Watertank NL STEAMFORCE, GECONCENTREERDE INNOVATIE...
1103909885DW9220DW9225D1_110x220mm26/02/1308:58Page22 STOF THERMOSTAAT THERMOSTAAT STRIJKETIKET AANDUIDING Nylon (Synthetische vezels, bijv. viscose, polyester) NYLON Zijde SILK Wol WOOL Katoen COTTON Linnengoed LINEN Tip : Omdat het afkoelen van de strijkzool langer duurt dan het opwarmen, adviseren wij u eerst de fijnere stoffen op de laagste stand te strijken. Kies voor kleding die uit diverse materialen bestaat, de temperatuur die geschikt is voor het meest kwetsbare weefsel.
1103909885DW9220DW9225D1_110x220mm26/02/1308:58Page23 8 • Druppelstop* Hierdoor kunt u voorkomen dat er water uit de zool druppelt wanneer de temperatuur te laag is. 9 • Auto-off functie* • Voor uw eigen veiligheid sluit het elektronische systeem de spanning af en het autostop controlelampje knippert fig.
1103909885DW9220DW9225D1_110x220mm26/02/1308:58Page24 MOGELIJKE PROBLEMEN EN OPLOSSINGEN Probleem Oorzaak De strijkzool blijft koud of wordt niet goed warm. Controleer of de stekker goed in het stopcontact zit of probeer het strijkijzer op een ander stopcontact. De temperatuurregelaar is te laag ingesteld. Draai de thermostaatknop op de juiste stand. De automatische elektronische uitschakeling* is ingeschakeld. Beweeg uw strijkijzer. Thermostaat Normale situatie. controlelampje gaat aan en uit.