
User manual


Setting the POI Set Icon
To use custom icons, create a folder called Icons in the ViewRanger folder on
the memory card (E:\ViewRanger\Icons\) and copy bitmap files into it. If the
bitmap has transparency information that will be used. If the bitmap does not
have transparency then any pixels that are near white will be made transparent.
The name of the bitmap file will be used as the name of the icon, so a bitmap
called garden.bmp would have a name of ‘garden’.
If the GPX file specifies an icon for a POI, then ViewRanger will use the
appropriate icon.
You can give a POI set a default icon by creating an icon with the same name
as the POI set. For example, if the POI set is created from a file called
garden.gpx, then it will be named ‘garden’ and will use the icon named ‘garden’
as its default icon.
The default icon is used if either the GPX file does not specify an icon, or if the
specified icon cannot be found.
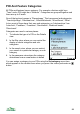
Viewing or Hiding a POI Set
You can see a list of a POI set’s contents by going to Organizer > POI Sets,
pressing the cursor pad centre or button and choosing List contents.
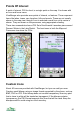
You can see a POI set on the map, with everything else temporarily hidden by
choosing View set on map. This will take you to the map view, which will pan
and zoom to show all the POIs. Other POIs, routes and tracks will not be
shown. To return to the usual display choose Options > Show all POIs.
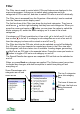
POI sets appear in the Filter view, and can be switched on and off from there.
They can also be switched on and off from the POI set list view.
Match images to track.
Photos can be geo-located using a recorded track. ViewRanger will create a
POI for each photo, taking its location from the track and time the photo was
taken. The photo is associated with the POI. The POIs are grouped into a set.
To do this select the track you recorded and choose Match images to track.
87