
User manual


Creating POIs
If you create your own POI you can give it a name, a description, set its icon
and set its category. It records its creation time, which is a useful way of logging
where you have been or when and where a photograph was taken.
There are various ways to create a POI:
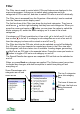
1. Directly in the Map view using the Options > Create > Create POI menu
option. You will be prompted to enter a name for the POI, then the POI will
appear in the centre of the screen. You can move it using the cursor keys or
on touch phones by touching and dragging. Press Done when you have
finished positioning it.
2. Import from another application or web site. POIs can be imported using
either the GPX or LOC file formats. To import, go to the Organizer and
choose Import / Export > Import GPX / LOC from the Options menu.
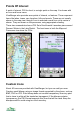
3. Take a photo and create a POI that links to it. From the Map view choose
Create > Take photo & mark. You will be swapped to the camera
application, from where you can take a photo. Swap back to ViewRanger by
exiting the camera. You will be prompted to name the POI. You will also be
prompted to enter a description for the photo, but you can leave this blank if
you wish. The POI will be created at the centre of the map view (you can
move it by pressing the cursor pad centre or button and choosing Move
point, or on touch phones by selecting it with the select cursor then
dragging it ). If the Map view is locked to the GPS, then the POI is
positioned at your current location. The POI’s image list will contain the
newly taken photo. When you view the POI’s Details the photo will be
shown. The POI is given the icon of a small camera.
4. Match images to track. While out record a track. Take photos using the
phone’s camera. When you get back select the track and choose Match
images to track. For each photo taken during the span of the track
ViewRanger will create a new POI and associate the photo with the POI.
The location will be calculated from the track. The POIs are grouped into a
POI set.
83