
User manual
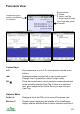


Panorama Rotate and Select Modes
There are 3 different modes for the arrow keys ◄► in the Panorama view.
Press 1 or use the options in the Rotate sub-menu to change between modes,
or on touch screen phones use the select button .
An icon appears in the status bar to indicate the mode. The selected View Tag
is underlined.
Rotate mode – arrow keys Select mode – arrow keys Single mode – just one View
rotate view, <R> icon select View Tags, rotating if Tag shown, arrow keys select
shown in header. necessary. <S> icon. View Tags, rotating if
necessary. <1> icon.
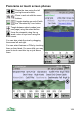
In single label mode the distance to the selected feature is shown. If the feature
or POI has a short description this is also shown.
Display >
Filter Filter in / out the types of POI you want displayed. For
example, you can hide woodland. Also controls the display
of individual POI sets.
Shading On/Off Switches shading of panorama on and off. For outside use,
switching shading off gives a higher contrast display
Point POIs On/Off Toggles the display of point POIs – that is the points of
interest that appear as a single point and are drawn with an
icon. It does not affect area POIs, or features, such as hills
and lakes.
Jump / Ground
Level
‘Jumps’ the viewpoint up in the air, which is useful for
seeing over hilltops. Height of jump can be set in settings.
Reset Zoom Resets the panorama display to the default zoom setting
GPS & Location >
Use GPS Position ViewRanger will move the viewpoint to be from the position
given by the GPS. If you have switched on Settings > GPS
> Use GPS heading, then the view will be rotated to be
centred on the direction you were last moving.
Connect to GPS Connects to a GPS.
Connect New GPS Only available on 2
nd
edition phones, Use this option if you
have previously used a different GPS receiver and need to
use a new one.
105