
User Guide


20-5110 Issue B 3
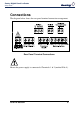
Installation
To install your instrument, you will need to carry out the following steps:
• Apply the engineering units label to the right-hand side of the display
panel. A sheet of labels covering the most commonly used
engineering units is supplied with all units. If the unit you require is
not on the sheet, a blank label is provided on which you can use
LETRASET™.
• Install the instrument into a panel.
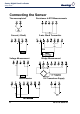
• Make connections to the instrument.
PLEASE NOTE:
• Ensure that the power to the instrument is switched off before
carrying out any installation or maintenance work.
• It is recommended that all connections to the terminals are made using
ferrules to afford greater reliability and to prevent short circuits
between adjacent terminals.
• Avoid installing the instrument close to switch gear, contactors or
motor starters.
• Do not place signal and power supply wiring in the same loom.
• Use screened cables or wires for all signal/sensor leads with screen
earthed at one point only.
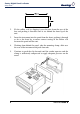
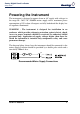
Panel Mounting
The instrument is supplied with an installation kit consisting of a
mounting clamp, a panel sealing gasket and terminal connectors.
Ensure that there is sufficient space behind the instrument panel - the
instrument requires a depth of 100mm (110mm when any options are
fitted) plus enough space to allow safe routing of cables.
To install the instrument:
1. Make panel cut-out with the dimensions as shown overleaf. Panel
thickness from 1.5mm to 9.5mm can be accommodated.
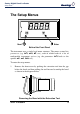
Sentry Digital Panel Indicator
Setup Guide