
Specifications


RotorWay International
Exec 162F Maintenance Manual
55
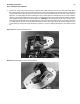
Photo #7: Measure the shims.
13. Remove the four (4) allen set screws on top of the shaft knuckle. NOTE: There are two (2) screws in each hole. Failure
to remove all four set screws will result in damage to the main drive pin. Lightly tap the pin out with a plastic hammer.
14. Inspect the shaft knuckle hole and clean with acetone.
15. After cleaning all parts, align them in sequence for re-assembly as shown on print E49-2000.
16. Place a light coat of grease on the main drive pin and in the shaft knuckle hole. Install the new drive pin in the knuckle
with the flats in the up position. Position pin so there is equal pin on either side of the knuckle.
DO NOT insert allen set
screws at this time.
17. Place the delrin shims on both sides of the appropriate stainless steel shim and measure with a micrometer. You
should choose shims that will give you the same thickness as measured in step 12. Place a thin coat of grease on the
outer surface of the shaft knuckle and on all shims.
18. Place the steel and delrin shims on the main drive pin. All shims should have a light coat of grease on every side. Do
this to shims on both sides of the hub knuckle. Refer to print E49-2000.
19. Place the clean hub plate back on the shaft in the correct position according to your earlier marks. Refer to photo #2.
20. Place one teeter block on the main drive pin with the bearings closest to the knuckle. Checking to insure that the
reassembly is the same as the disassembly (check your identification marks), align the holes with the hub plate and
insert the bolts through the teeter blocks and through the hub plate. Torque the bolts to 24 ft. lbs.
21. Place the other teeter block on the main drive pin following the same assembly procedures.
22. Replace the clamp on the teeter blocks and tighten slightly as in Note 7 and photo #4. Replace the bolts through the
holes with grease and using the clamp, align the holes. Use a plastic hammer to drive the bolts through the holes. (If
the bolts drive hard, adjust the clamp pressure so that they go in with ease.)
23. Torque the bolts down to 24 ft. lbs. and remove the “C” clamp.