
Specifications


RotorWay International
Exec 162F Maintenance Manual
54
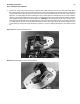
8. Next remove the two snap rings and the large thin washer from the main drive pin. See photo #6.
Photo #6: Remove snap rings.
9. Deburr the edge of the snap ring grooves and edge of the pin with 400-600 wet and dry sandpaper.
10. With hand pressure or a light tap from a plastic mallet, remove the teeter blocks from the main drive pin. CAUTION:
If shims come off with the teeter block, carefully put them back on the drive pin in
exactly the same way they came off.
Inspect the teeter block for any cracks and galling the shims may have caused.
11. If the bearing replacement is necessary in the teeter blocks either by R.C.O. time or On Condition, follow the next
steps. If the bearing is OK, skip the next sequence and go to step 12.
A. Clean teeter block in acetone or equivalent solution.
B. Heat block to 250 degrees in an oven and press the old bearing out of the block. The bearing should come out with
light pressure.
C. Clean all mating bearing surfaces and place a small amount of Loctite #609 on both the outer race of the bearing
and the inner hole of the teeter block. CAUTION: Do NOT let the Loctite get into the greased holes in the center
of the bearing.
D. Reheat to 250 degrees and press the new bearing in place using a tool or spacer that will allow you to press on
the outer race of the bearing and not the inner race.
E. Keeping on a flat surface, press the bearing until flat with the inside of the teeter block. Let cool and check the
bearing for smoothness with your fingers.
F. Give the bearing 3-4 shots of grease through the grease fitting on the teeter block and wipe off excess grease.
Repeat process for the other teeter block.
G. Remove the hub plate, inspect the condition and clean. Do not remove your identification markings.
12. Next, carefully remove the steel and delrin shims from the main drive pin. Find a smooth spot on these parts and
measure all shims together with a micrometer. (Remember not to mix the pilot and passenger side shims.) See
photo #7.