
user manual


Table Of Contents
- Contents
- Important Safety Instructions
- 1: Controls and Connections
- 2: RR-1070 Remote Control
- 3: Connecting the Speakers
- 4: Connecting the TV
- 5: Connecting a Cable, Satellite, or HDTV set-top box
- 6: Connecting a VCR
- 7: Connecting a CD Player/CDR Recorder
- 8: Connecting an Analog Audio Tape Recorder
- 9: Connecting AM and FM antennae
- 10: Parental Lock Country Codes
- About Rotel
- Getting Started
- Features
- Audio Features
- Other Features
- Supplied Accessories
- A Few Precautions
- Placement
- CONNECTIONS
- Notes on connections
- Cable selection
- Video Connections
- Digital Audio
- Making Connections
- Connecting Speakers
- Connecting a Subwoofer
- Connecting the TV Monitor
- Setting the PAL/NTSC Switch
- Connecting a Cable, Satellite, or HDTV Set-top Box
- VCR or Digital Video Recorder
- CD Player/CDR Recorder
- Audio Tape Recorder
- AM Antenna
- FM Antenna
- AC Input
- OPERATING THE RSDX-02
- Front Panel Overview
- STANDBY Button
- DVD Drawer
- Input Buttons
- VOLUME Control
- DVD Audio LED
- INPUT AG/DG Button
- SURROUND ON/OFF Button
- SURROUND MODE Button
- LCD Display
- DVD Transport Buttons
- SETTING Button
- ADJUST button
- MEMORY Button
- CONTROL Buttons
- Remote Sensor
- Remote Control Overview
- Programming the RR-1070 MENU Button
- Using the RR-1070 ROTEL Button
- Changing Pages PAGE Buttons
- POWER Button
- VOLUME Buttons
- CHANNEL Buttons
- HOME Button
- MUTE Button
- Basic Operations
- Power On/Off
- SLEEP Timer
- Volume Adjustments
- Muting the Sound
- Changing Display Brightness
- Selecting Source Inputs
- Selecting an Input from the Front Panel
- Selecting an Input from the Remote
- Changing Input Name
- Selecting Digital or Analog Inputs
- Selecting the Digital Signal
- Attenuating Analog Inputs
- Activating Record Mode
- Surround Modes
- Dolby Surround Dolby Pro Logic II
- Dolby Digital
- DTS 5.1
- All-Channel Stereo
- DSP
- Surround Off
- Manually Selecting Surround Modes
- Surround Sound On/Off
- Selecting a Surround Sound Mode
- Tuner Controls
- Selecting FM/AM
- Tuning from the Front Panel
- Tuning from the Remote
- Storing/Tuning Station Presets from the Front Panel
- Storing/Tuning Station Presets from the Remote
- Changing the FM MODE
- DVD PLAYER
- About Discs
- Disc Formats
- DVD Region Codes
- Disc Structure
- Digital Audio Formats
- Playing DVDs
- Inserting a Disc
- Playing a Disc
- Stopping Disc Playback
- Pause/Still Frame
- Skip forward/back
- High Speed Play
- Slow Speed Play
- On-Screen Display (OSD)
- Time Display
- Advanced Features
- Progressive Scan (NTSC only)
- Zoom
- Selecting a Scene Angle
- Selecting Subtitles
- Selecting Audio Tracks
- Setting Video Picture Adjustments (VFP)
- Still Pictures on DVD-A Disc
- Playing Specific Selections
- Find Scenes from a DVD Menu
- Find a Scene from a Video CD/SVCD Menu
- Selecting a Title/Group
- Entering a Scene Number
- Find a Location with Time Search
- Repeat Play
- Random Play
- Program Play
- MP3 and JPEG files
- Control Menu
- Additional JPEG features
- SETUP
- Quick Setup
- Comprehensive Setup
- Setup Procedure
- Subwoofer Setting (SUBWFR)
- Speaker Settings (FRNT SP, CNTR SP, SURR SP)
- Delay Settings (FRNT D, CNTR D, SURR D)
- Crossover Frequency Setting (CROSS)
- LFE Attenuation Setting (LFE)
- Dynamic Range Compression (D.COMP)
- Digital Input Assignment (DGT)
- Automatic Surround Mode (AUTO SR)
- Quick Setup
- Video Output Mode (VOUT)
- Sound Adjustments
- Setup Procedure
- Front Speaker Balance (BAL)
- Tone Adjustments (BASS and TREBLE)
- Speaker Levels (SUBWFR, CENTER, SURR L, SURR R)
- DSP Effect LEVEL (EFFECT)
- Subwoofer Audio Position (AUDIO POS)
- CHOICE MENU SYSTEM
- Using the Choice Menus
- Language Menu
- Menu Language
- Audio Language
- Subtitle
- On Screen Language
- Picture Menu
- Monitor Type
- Picture Source
- Screen Saver
- MP3/JPEG
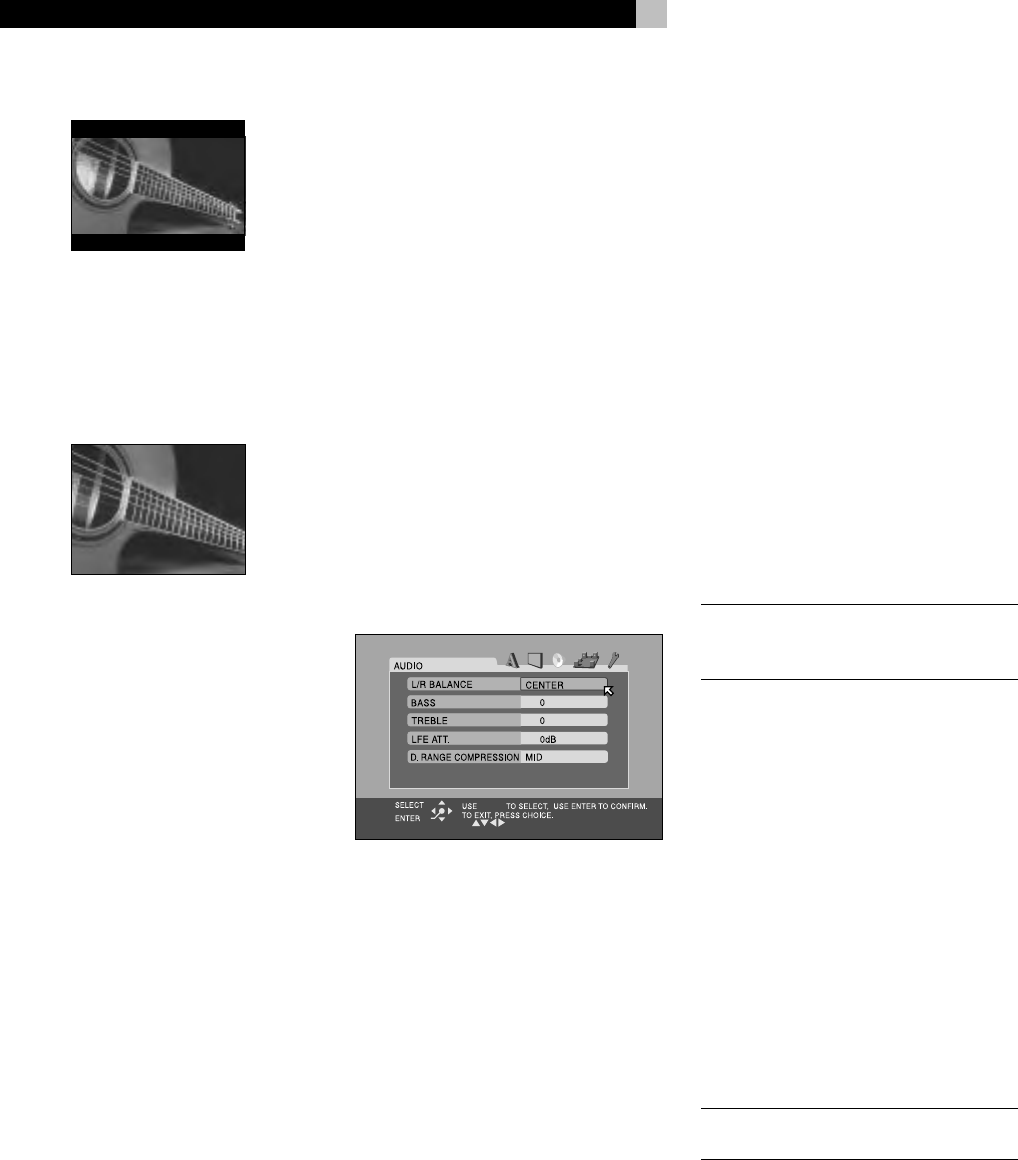
- Audio Menu
- L/R Balance
- Bass
- Treble
- LFE Attenuation
- Dynamic Range Compression
- Speaker Setting Menu
- Size
- Level
- Distance
- Crossover
- Return to Initial
- Others Menu
- Resume
- On-Screen Guide
- Auto Standby
- Parental Lock
- To Change Parental Lock Settings
- Playback with Parental Lock
- Specifications
34
RSDX-02 DVD Receiver
4:3 LB (Letter Box)
Select this option for a standard aspect ratio
TV. 4:3 aspect ratio programs fill the screen.
Wide-screen video images are displayed full-
width with black letterbox masks inserted top
and bottom.
4:3 PS (Pan/Scan)
Select this option for a standard aspect ratio
TV. 4:3 aspect ratio programs fill the screen.
Wide-screen video images enlarged to fill the
screen vertically, cutting off portions of the left
and right sides.
Picture Source
This setting optimizes the Progressive Scan de-
interlacing/line doubling for film or video source
material. It has no effect unless the RSDX-02’s
Progressive Scan feature is activated.
VIDEO (Normal): Optimized for video
source material without rapid motion. It uses
“weave” de-interlacing that preserves as much
detail as possible at the expense of jagged
lines during fast motion.
VIDEO (Action): Optimized for video source
material with rapid motion. It uses a “bob”
line doubling that reduces jagged lines dur-
ing fast motion at the expense of fine detail.
FILM: Activates reverse 3:2 pulldown de-in-
terlacing and is optimized for film source im-
ages. It should only be used to force the pro-
gressive scanning into film mode.
AUTO: Automatically recognizes film or video
source material and uses the best possible de-
interlacing. This is the default mode and pro-
vides the best overall performance for the widest
range of DVD material.
Screen Saver
TV Monitors can be easily damaged if a static
image is displayed for a long time. The Screen
Saver feature automatically darkens the screen
when a still image (such as a DVD menu) is
displayed for five minutes.
ON: Activates the automatic screen saver
function.
OFF: Disables the screen saver function.
MP3/JPEG
Some discs contain both MP3 audio and JPEG
images. This setting determines which of the
two is played.
MP3: Select this option to play MP3 files.
JPEG: Select this option to play JPEG files.
Audio Menu
There are five items on the Audio Menu to tailor
the audio performance of the system. These
adjustments can also be made from the front
panel and/or remote control as described in
the Comprehensive Setup and Sound Settings
sections of the manual.
L/R Balance
The BAL item allows you to adjust the left/right
balance of the front speakers with a range of
L –21 to Center and Center to R –21.
• CENTER: The standard setting with the
sound balanced equally between the two
front speakers.
• L (–): Settings indicated by an L followed
by a negative number indicate that the
volume of the left speaker is reduced and
the sound shifted towards the right.
• R (–): Settings indicated by an R followed
by a negative number indicate that the
volume of the right speaker is reduced and
the sound shifted towards the left.
Bass
Adjust the low frequency response of the sys-
tem over a range of –10 to +10. A setting of
0 is flat response with no cut or boost.
Treble
Adjust the high frequency response of the system
over a range of –10 to +10. A setting of 0 is
flat response with no cut or boost.
LFE Attenuation
This setting provides an option to reduce the
level of the Dolby Digital and DTS Low Fre-
quency Effects (LFE) channel from its normal
setting if you hear bass distortion.
• 0dB: The normal setting, reproduces the
LFE channel at its full level.
• –10dB: Reduces the level of the LFE channel
by 10 decibels.
NOTE
: The LFE attenuation setting has no ef-
fect with any input signal other than Dolby
Digital or DTS.
Dynamic Range Compression
Dolby Digital recordings are capable of wide
dynamic range (the difference between the soft-
est and loudest sounds). In some cases, this
may tax amplifiers and/or speakers. In other
cases, you may want to reduce the dynamic
range when listening at low volume levels.
• MID: slightly reduced dynamic range,
roughly comparable to the signal from a
compact disc
• MAX: more heavily reduced dynamic
range, but still comparable to the signal
from a typical VHS Hi-Fi recording.
• OFF: full dynamic range; no compression
NOTE
: The Dynamic Range Compression fea-
ture ONLY affects Dolby Digital signals.