
User's Manual


netAqua
TM
USER MANUAL Roslen Eco-Networking Products
v1.0.03 © 2014 by Roslen Eco-Networking Products. All rights reserved Page 35 of 59
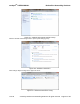
• Press the Enter button at the bottom of the netAQUA for more than 10 seconds and less than 30
seconds. When the 10 second timeout is reached, the Status LED will start flashing to indicate
that the system is ready to restart, which will happen once your release the button.
• Power cycle the netAQUA.
Once the system restarts it will be running the latest version of software.
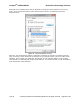
Note that the bootloader will rarely be updated. The bootloader is the base software that loads the main
program. If there is a bootloader software update, however, please take special care when performing
that update to make sure that the update process is not interrupted by turning off the device. If this
happens, you may render the device unusable, and it might have to be sent to us for repair. This is also
important while updating the netAQUA software. While there are protections built into the system to
prevent system failure during software update, these do not cover all possible scenarios, so please
ensure that the device is powered-up during the update process for software as well as the bootloader.
2.9. Manually Start a Zone Using the LCD/Pushbutton Interface
There is no doubt that the Browser Interface Control Panel is the easiest way to control the netAQUA but
there are times when it is not practical or convenient to get on a networked device like a computer or
smartphone. The LCD interface is made for those times when you or a caretaker are near the netAQUA
and want to just turn a zone on and off or maybe run a full cycle. The interface may seem a bit confusing
at the beginning, but once you see the logic, it will become straight forward. For the most part, the button
rules are consistent throughout the interface.
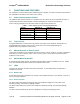
The four pushbuttons are PROG, SCROLL DOWN, SCROLL UP, and ENTER. They allow you to go
between pages and to program most of the watering related items in the Browser Interface. For each
button you can either press it or hold it. Press means a momentary button push. Hold means pushing the
button for 2 seconds or a bit more. The function of each is:
•
Press SCROLL DOWN or SCROLL UP
1. moves you between pages on same level, or
2. moves highlighting cursor between items on a programming page, or
3. changes the values of the highlighted items when selected to program.
•
Hold SCROLL DOWN or SCROLL UP
•
moves you vertically up and down between subpages
Hold PROG
•
puts page into programming mode.
Press PROG
•
puts highlighted item into programming mode.
Press ENTER
•
is like “select” or “accept”.
Hold
•
ENTER is like “apply change”.
Hold SCROLL DOWN and SCROLL UP
will open Help pages if there is a flashing “?”.
To help you along the way, many pages have simple instructions on them, and there are contextual Help
Pages as well.
Anyway, to turn on a zone, this is what you do. If the LCD is off, touch any button to turn it on. You can
enable continuous operation, but that is another story. You probably have noticed that after a couple of
minutes of inaction on the buttons the page will revert to the Main Control Page. Starting on that page,
press SCROLL UP. That will take you directly to the Manual Watering Operation page. Follow the
direction on the page, that is, hold PROG to run. That will take you to the Manual Operation page. You
will see a flashing “P” in the lower right which shows that you are in a programming mode, and a flashing
“?” in the upper right which says that there is a Help page. You can get to the Help page by holding both
SCROLL DOWN and SCROLL UP together. You also see a highlight square by “Cycle Number”. Since
we want to turn on a zone you want to move the highlight to “Zone” so you press SCROLL DOWN once.
Now you want to set the zone number that you want to turn on so you press PROG. The highlight starts
to flash so it’s ready to be set. Press SCROLL UP or DOWN until you get the zone you want and press
ENTER to accept. The duration is at one minute so if you want to change that press SCROLL DOWN to
move the highlight to “Time” and repeat the sequence you used for the zone. Press PROG, Press
SCROLL UP until you reach the number of minutes that you want, press ENTER. To activate the zone,