
User's Manual


netAqua
TM
USER MANUAL Roslen Eco-Networking Products
v1.0.03 © 2014 by Roslen Eco-Networking Products. All rights reserved Page 29 of 59
updates is that you don’t have to install anything on any other computer. Also, the router in any home
computer network tends to stay turned-on all the time, even if all other computers are turned off.
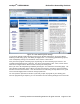
Once you set-up the account with a DDNS service provider and install the DDNS client on a computer or
tablet connected to your network, you’re finally done. You will access your netAQUA from the internet
using your unique DDNS address followed by :PortAddress that you set-up as part of Port Forwarding
(Section 2.6.1). For our example, that would be:
BettinaVonArnim.no-ip.org:4567
So, what are the costs involved in setting-up and using a DDNS service? Fortunately, there are many
options that are free, and those that carry a subscription fee are not costly. The key is that there are
many adequate solutions that don’t cost anything, so you should first start there, with a provider that does
not charge anything for a basic DDNS service. And, typically, the DDNS clients are free as well.
2.6.5. A Summary of Accessing Your netAQUA from the Internet
Even though setting-up Port Forwarding might sound daunting at first, it ends-up being relatively straight
forward if you follow these steps described in detail above:
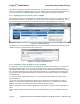
1. Section 2.6.1, where we discuss setting up Port Forwarding through your router
2. Section 2.6.2, where we describe how to set-up Access Security on the netAQUA
3. Section 2.6.3, to see how to set-up a Static IP Address on the netAQUA
4. Section 2.6.4, to set-up a DDNS Service to maintain reliable access to the netAQUA from the
Internet.
Access to a device on your home network through Port Forwarding techniques has been an established
method for many years, since home networking became widespread in the 1990’s. It works very reliably,
and although the many router manufacturers propose different ways to set this up through their routers, in
all cases the results are stable and secure.
2.7. Access the netAQUA Directly
There may be cases when you need to access the netAQUA directly from your computer, without
connecting it first to your home computer network. For example, if you change your router and set-up a
new WiFi network, but it’s too far to run an Ethernet cable to the netAQUA, and you need to change the
device WiFi settings to make it work on the new network.
To connect without a router, first turn off the netAQUA. Next, place your laptop near the netAQUA and
insert one end of the Ethernet cable into your computer and the other end into the device Ethernet port.
When your computer is fully powered-up, turn on the netAQUA and wait for it to completely start-up.
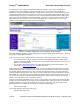
Once it is ready, use the Scroll Up or Scroll Down buttons to navigate to the System Settings screen.
Initially, the IP Eth field will show 0.0.0.0, but after about 30 seconds you should see the device set-up to
operate on its fixed Ethernet address, whatever has been programmed into the Static IP field of the
Network Setting section of the System Settings tab. In our example, the static address is 192.168.1.46.
Once that static address is indicated on the LCD System Settings screen, the netAQUA is ready to
connect directly to your computer.