
User's Manual


netAqua
TM
USER MANUAL Roslen Eco-Networking Products
v1.0.03 © 2014 by Roslen Eco-Networking Products. All rights reserved Page 21 of 59
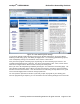
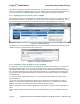
Figure 16: Main Watering Plan Settings
To get started, globally enable watering by selecting the Enable radio button in the System Master
Watering Control setting group, and clicking the Apply button. The remaining global watering options,
such as Slope/Clay Settings, are described in other sections of this manual.
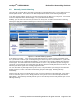
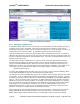
Next, proceed to program a Watering Cycle, by selecting one of the Watering Cycle sections. Our
example shows Watering Cycle 1 morning. The names of the watering cycles, zones, and the device
itself can be configured in the Aliases section of the System Settings tab.
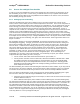
Each cycle has to be independently enabled by selecting the Yes radio button and clicking Apply. The
Timer Settings configuration group is where you select the frequency, start times, and zone watering
durations for each connected zone. Once the selections are made using the drop-down menus, you’ll
need to click the Apply button to make the changes permanent.
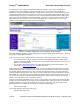
You can repeat this procedure for all other cycles that you plan to program for your watering plan.
Once the programming is complete, you can check when the next watering will begin on the Status tab.