
User's Manual


netAqua
TM
USER MANUAL Roslen Eco-Networking Products
v1.0.03 © 2014 by Roslen Eco-Networking Products. All rights reserved Page 19 of 59
2.3. Connect the netAQUA to the Irrigation Valves
Connecting the irrigation valves to your netAQUA is similar to the way these connections are made to
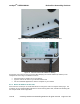
traditional sprinkler controllers. First, you thread the control wire bundle through the bottom of the
netAQUA, through the webbed grommet.
Figure 13: Webbed Grommet for Cable Entry
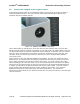
These cable bundles are typically five or seven wire, with each wire a different color. Once the cable
bundle is brought inside the netAQUA, the insulation on each wire needs to be stripped about ½ inch (this
can also be done before you insert the cable bundle into the netAQUA). At this point, you need to attach
each zone wire to the appropriate zone terminal, as marked on the shield to the left of the green zone
terminals. Finally, the common wire needs to be attached to one of the terminals labeled Common.
That’s pretty much it.
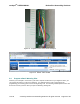
Note that there are nine zone terminals available in the netAQUA. The ninth zone terminal is marked
Master/Zone 9. As configured when the netAQUA is shipped from the factory that terminal is set-up as
Zone 9, which operates the same as all of the other valve outputs. If you have a master valve, which
opens-up watering to all of the other valves, or if you have a pump that needs to be turned on to provide
the flow rate for the irrigation heads, you’ll need to connect these to the terminal marked Master/Zone 9.
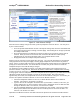
In addition, you will need to configure that terminal as the Master valve terminal. To do this, select the
System Settings tab in the Browser Interface and then the Master Valve section. Next, check the
Enabled box in the Master Valve setting group, and click the Apply button. You now have the
Master/Zone 9 valve terminal set-up to power the master valve or a pump each time any of the other eight
zones are powered.