
User's Manual


netAqua
TM
USER MANUAL Roslen Eco-Networking Products
v1.0.03 © 2014 by Roslen Eco-Networking Products. All rights reserved Page 18 of 59
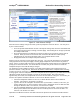
Figure 12: WiFi Interface Settings
When all of these settings changes are made, you’ll be prompted to restart the device. You many do so
by one of three methods:
• Go to the System Restart/Restore section of the System Settings tab, check the Confirmation box
in the Restart System group of settings, and click Apply. After clicking OK on the pop-up window,
the netAQUA will restart.
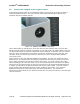
• Press the Enter button at the bottom of the device for more than 10 seconds, but less than 30
seconds. When you reach the 10 second mark, the Status LED will start to flash quickly,
indicating that you can release the Enter button; the netAQUA will then restart.
• Simply power down the netAQUA and power it back up.
Note that it is not necessary to press Apply after each step. You can make all changes to your selected
settings parameters and then press Apply. Pressing Apply multiple times does not have any adverse
effects. Also, if you press Apply after each of the WiFi configuration settings changes, the netAQUA will
prompt you to restart the device. You should click OK each time, but you do not have to restart the
netAQUA until you’re done with all settings changes.
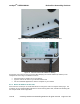
You should check if the netAQUA connects to your WiFi network before you install the device in its
permanent location. During this test,
disconnect the Ethernet cable from the netAQUA before restarting
2.2
,
to make sure that the connection is via the WiFi interface. And place the device near the router to ensure
a strong signal. Once the netAQUA restarts and completes the start-up process, you should see the WiFi
LED flash red while the device attempts to connect to your WiFi network. After a time less than
approximately 15 seconds, the netAQUA will connect and the LED will turn solid green. At this time, you
have the three options described in Section to access the Browser Interface:
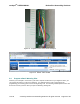
• Check the netAQUA IP address on the LCD; it will be different than that for the Ethernet
interface. For reference, see Section 2.2.1 above.
• Type the name of the netAQUA in the address bar of your browser. However, in this case, you
need to add the letter “w” at the end of the device name to distinguish access via WiFi from that
through the Ethernet cable. For reference, see Section 2.2.2 above.
• Use the netFINDER application to locate the netAQUA on your network. You’ll see the device
listed by name with the letter W added at the end to identify that it is connected via WiFi. For
reference, see Section 2.2.3 above.
Operation of the Browser Interface over WiFi is identical to operation over the Ethernet cable interface.