
User's Manual


netAqua
TM
USER MANUAL Roslen Eco-Networking Products
v1.0.03 © 2014 by Roslen Eco-Networking Products. All rights reserved Page 11 of 59
2.2. Connect the netAQUA to Your Computer Network
The netAQUA is a network-enabled device, so although the fundamental watering plan programming
steps can be accomplished using the local LCD/pushbutton interface, you will access a host of additional
features and configuration options by opening the netAQUA Browser Interface in your favorite web
browser. To do this, you’ll need to connect the netAQUA to your computer network.
Also, if you wish to use the netAQUA with your WiFi network (netAQUA 9D WIFI only), you’ll need to first
connect to the network using the cable interface in order to configure the device to work on your WiFi
network.
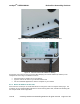
The best way to do that is to locate the netAQUA near your router or near a network switch. This will
allow you to easily connect the device to your wired network for further configuration. If you’re going to do
this step only to configure the WiFi interface, or some other part of the wired network interface, it’s
simplest just to take the cover off the netAQUA and place one end of the included Ethernet cable directly
into the connector marked Ethernet. For a permanent installation, you may wish to pass the Ethernet
cable through the webbed grommet at the bottom of the netAQUA.
Figure 2: Ethernet Cable Connection to the netAQUA