SATA+Ultra ATA RAID CONTROLLER RC212 User Manual
SATA+ Ultra ATA RAID CONTROLLER RC212 User Manual Feature Highlights Compliant with PCI Specification, Rev. 2.2 Compliant with PCI “Plug & Play” 32-bit 33 MHz PCI interface Drive support: Serial ATA, Ultra ATA/133, Ultra ATA/100,Ultra ATA/66 Support ATA/ATAPI6 Supports SATA up to 150MB/Sec 48-bit LBA Support: Recognizes drives bigger than 137GB Support Windows 98SE, ME, 2000, XP, Server 2003 ant NT 4.
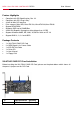
SATA+ Ultra ATA RAID CONTROLLER RC212 C D E F G User Manual SATA Connector (Internal) SATA Connector (Internal) PATA Connector Jumpers control BC Switch Jumpers control AD Switch IDE/RAID: Jumper Settings JP J8-J11 1-2 close 2-3 close J12-J15 1-2 close 2-3 close Description Enable SATA Connector B Enable SATA Connector C Enable SATA Connector A Enable SATA Connector D Default Mode is all jumper 2-3 close, so C-D is active and A-B is inactive on default. 1.
b e r SATA+ Ultra ATA RAID CONTROLLER RC212 User Manual attached hard drives. Please follow the steps below to setup your disk array. Warning: Please backup data in your hard drives to prevent data damage resulting from the unfamiliarity with the operation. Boot your system Please attach your hard drives to the VIA VT6421 RAID card, boot your system and then you will see the following message shown by the VIA VT6421 RAID card onboard BIOS on the screen: VIA Technologies, Inc.
SATA+ Ultra ATA RAID CONTROLLER RC212 User Manual Array Mode RAID 1 (Mirroring) Select Disk Drives Start Create Process Totally, there are four configurations supported: RAID Configurations Number of disks level/Type needed RAID 0 Disk Striping 2 or 3 or 4 RAID 1 Disk Mirroring 2 RAID 0+1 Disk Striping 4 + Mirroring JBOD Disk 2 or 3 or 4 Concatenation Driver Installation Installing driver on Windows® 98SE/ME 1. 2. 3. 4. 5. 6. 7. 8. Start your PC.
SATA+ Ultra ATA RAID CONTROLLER RC212 3. User Manual Folder “\ RC212\” and double click “Setup.exe” to start the driver installation procedure. Follow the on-screen instructions to complete the installation. When the installation is complete, please select “Yes, I want to restart my computer now.” and restart your system. Installing driver on Windows® NT 1. 2.