Modem RNX-56CX User Manual
Modem RNX-56CX User Manual Contents For AUSTRALIA User Warning ………………….………………………………………………… 3 Caution………………. ……………………………………………………. 3 Introduction Features ………………….………………………………………………… 4 System Requirements ……………………………………………………. 4 Package Checklist ……………………………………………………….. 4 Installation Hardware Installation ………………………………………………………..
Modem RNX-56CX User Manual For AUSTRALIA User WARNING * Unit shall be connected to the Telecommunications Network through line cord, which meets the requirements of AS/ACIFS008. * This card must be used with the PC screw down lid. * Telecommunications network voltages exist inside the PC and Telecommunication line connection shall be removed before opening the cover. * For safety reasons, only connect equipment with a Telecommunications compliance label.
Modem RNX-56CX User Manual Introduction Features This modem supports the following communication standards. ITU-T is also known as CCITT. Data V.92 (Lite) V.90, V.34, V.32bis, V.32, V.22bis, V.21, V.22 Bell 103 & 212A V.44, V.42bis & MNP 5 (Data compression) V.42 & MNP2-4 (Error correction) Fax V.17 V.29 V.
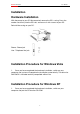
Modem RNX-56CX User Manual Installation Hardware Installation With the power to your PC disconnected, remove the PC’s casing. Press the modem card firmly into the PCI slot, and secure it with screws to your PC. Reinstall the casing on your PC. Phone : Phone jack Line : Telephone line jack Installation Procedure for Windows Vista 1. Once you have completed the hardware installation, switch on your computer and system will complete the installation automatically.
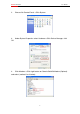
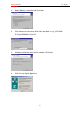
Modem RNX-56CX User Manual 2. Please click Control Panel ->Click System. 3. Under System Properties select Hardware->Click Device Manager, click OK. 4. Click Modems->Click right button on Generic Softk56 Modem (Optional) and select: (method 1 or 2 below).
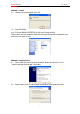
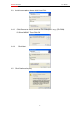
Modem RNX-56CX User Manual Method 1. Install 1.1 Confirm Device Removal, click OK. 1.2 Run (CD-ROM) e.g., D:\Driver\WINXP\HXFSETUP (It will install automatically) *Please wait until the windows show the message Found New Hardwared your new Device is ready to use. Method 2. Update Driver 2.1 The wizard will search for new hardware. Select install from a list or specific location (Advanced). Click Next. 2.2 Select Don’t search. I will choose the driver to install and click Next.
Modem RNX-56CX 2.3 2.4-1 User Manual Install new modem, please click Have Disk. Click Browse to search for driver files and open it. e.g., (CD-ROM) D:\Driver\WINXP. Than Click OK 2.4-2 2.5 Click Next.
Modem RNX-56CX 2.6 User Manual Click finish Installation Procedure for Windows 2000 1. Once you have completed the hardware installation, switch on your computer and put the CD into the CD-ROM. The wizard will search for new hardware. Click Next. 2. Select Search for a suitable driver for my device (recommended) and click Next.
Modem RNX-56CX User Manual 3. Select Specify a location and click Next. 4. Click Browse to search for driver files and open it. e.g., (CD-ROM) D:\Driver\WIN2000. Click OK. 5. Windows found the driver of this modem. Click Next. 6. Click Yes for Digital Signature.
Modem RNX-56CX 7. User Manual Click Finish to complete the installation. Installation Procedure for Windows ME 1. Once you have completed the hardware installation, switch on your computer and put the CD into the CD-ROM. The wizard will search for new hardware. Select Specify the location of the driver (Advanced) and click Next. 2. Select Search for the best driver for your device (Recommended) and Specify a location. Click Browse to search for driver files and open it. e.g.
Modem RNX-56CX User Manual 3. Windows found the driver of this modem. Click Next. 4. Click Finish to complete the installation. 5. Windows has found the new hardware for Modem Device, please click Next. 6. Select Search for the best driver for your device (Recommended) and Specify a location. (Please click Browse to search for driver files and open it. e.g., D:\Driver\WinMe) and click Next.
Modem RNX-56CX User Manual 7. Windows found the driver of this modem. Click Next. 8. Click Finish to complete the installation. Installation Procedure for Windows 98SE 1. Once you have completed the hardware installation, put the CD into the CD-ROM. The wizard searches for new hardware. Click Cancel. 2. Run CD-ROM e.g., D:\Driver\Win98SE\HXFSETUP. EXE (it will install).
Modem RNX-56CX User Manual Modem Dialing Location **If you want to change your dialing location, please follow the instructions and samples: For WIN 2000/XP Please click Control Panel->Phone and Modem Options ->Under Dialing Rules click Edit, and then you can change your location. For WIN ME/98SE Please click Control Panel->Modems->Under General click Dialing Properties, and then you can change your location.
Modem RNX-56CX User Manual 1. On Control Panel/Network Connections, click Create a new connection. 2. Click Next.
Modem RNX-56CX User Manual 3. Select Connect to the Internet and click Next. 4. Select Set up my connection manually and click Next.
Modem RNX-56CX User Manual 5. Select Connect using a dial-up modem and click Next. 6. Input ISP Name and click Next.
Modem RNX-56CX User Manual 7. Input User name, Password and Confirm password, select Use this account name and password when anyone connects to the Internet from this computer. 8. Click Finish to complete manual connection.
Modem RNX-56CX 9. User Manual Click Dial to connect to Internet. Manual Dial-up Connection Settings (For Vista) 1.
Modem RNX-56CX User Manual 2. click Set up a connection or network 3.
Modem RNX-56CX User Manual 4. Input Dial-up phone number, User name, Password then click Connect 5. Waiting for Dial-up Connection. System will complete the other steps automatically.
Modem RNX-56CX User Manual 22
Modem RNX-56CX User Manual 23
Modem RNX-56CX User Manual 6. Once this screen pops out, the internet is connected successfully. Thank you for purchasing a quality Rosewill Product. Please register your product at : www.rosewill.com for complete warranty information and future support for your product.