3.5" SATA to USB 3.
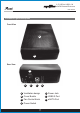
3.5" SATA to USB 3.0 & eSATA External Enclosure user manual Enclosure Figure Description Front View A B Rear View D E C F G A Ventilation design E Power Jack B Cover Buckle F USB3.
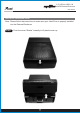
.5" SATA to USB 3.0 & eSATA External Enclosure user manual Hard Drive Installation Guide Note: Please follow the instructions to make sure your Hard Drive is properly installed into the External Enclosure STEP1 Push the cover “Buckle” inwardly to lift plastic cover up.
3.5" SATA to USB 3.0 & eSATA External Enclosure user manual STEP2 Pull out the HDD plastic tray. STEP3 Place 3.5” SATA HDD into the plastic tray and screw the HDD on it.
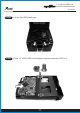
3.5" SATA to USB 3.0 & eSATA External Enclosure user manual STEP4 Slide the HDD into the case and push HDD inwardly until SATA connector well connected. STEP5 Close the top cover until the buckle is locked.
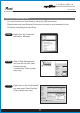
3.5" SATA to USB 3.0 & eSATA External Enclosure user manual Hard Drive Formatting Guide * You may format your Hard Drive by using the USB connection. * Please make sure your External Enclosure is turned on and connected to the PC before formatting the Hard Drive. STEP1 Right-click “My Computer” and select “Manage”. STEP2 Select “Disk Management” and you will see your Hard Drive shown as “Unallocated” (Disk number may vary) STEP3 Right-click on the “Unallocated” box and select “New Partition”.
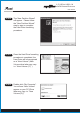
3.5" SATA to USB 3.0 & eSATA External Enclosure user manual STEP4 The “New Partition Wizard” will appear. Please follow the "New Partition Wizard" step by step to complete the Hard Drive formatting procedure. STEP5 Once the Hard Drive formatting procedure is completed, the Hard Drive will be recognized as a “New Volume” (New Volume drive letter may vary i.e. “New Volume (Z:)” ) STEP6 Double-click “My Computer”. You will see “New Volume” appear on your PC (Drive letter may vary i.e.
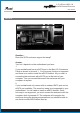
3.5" SATA to USB 3.0 & eSATA External Enclosure user manual NOTICE Question: Does this SATA enclosure support hot swap? Answer: Yes, but it depends on the motherboard you have. 1. If your motherboard has an eSATA port in the Back I/O Connectors Panel as shown in picture # 1 . Your hot-swap function is supported and there is no need to install the eSATA bracket. All you need is connecting the enclosure with eSATA port at the back of your computer.
3.5" SATA to USB 3.0 & eSATA External Enclosure user manual Thank you for purchasing a High-Quality Rosewill Product. Please register your product at : www.rosewill.com for complete warranty information and future support for your product. If you have any question while using our products, please visit our website : www.rosewill.
www.rosewill.