ATX Computer Case R7329 User Manual
ATX Computer Case R7329 User Manual Chapter 1 Product Introduction Drawing ………………………………….........................……….. 2 Specification……………………………......................…….……. 2 Chapter 2 Installation Removing and installing side panels..........................................3 Installing the Motherboard.........................................................4 Installing Add-on card ...............................................................4 Installing Drives (CD/DVD ROM, FDD and HDD)..............
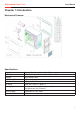
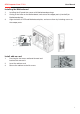
ATX Computer Case R7329 User Manual Chapter 1: Introduction Mechanical Drawing: Specifications: Dimensions M/B Type Material 5.25” Drive Bay 3.5” Drive Bay I/O Panel Cooling System Power Supply Expansion slot 200mm(W) x 430mm(H) x 480mm(D) ATX 12” x 9.6” (30.5cm x 24.5 cm); Micro-ATX SECC Metal 0.8cm 5 (Exposed) 2 (Exposed); 5 (Hidden) USB2.
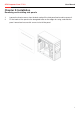
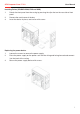
ATX Computer Case R7329 User Manual Chapter 2: Installation Removing and installing side panels 1. 2. Loosen the thumb screws from the back and pull the side panel backward to remove it. Fit the hooks of the panel to the elongated holes on the edges of casing, and slide the panel toward and secure with screws to install the panel.
ATX Computer Case R7329 User Manual Installing the Motherboard 1. 2. 3. Installing the IO panel that comes with Motherboard package. Aiming at the holes on the Motherboard, and secure the copper posts (stand off) on Motherboard plate. Align the holes of PCB and Motherboard plate, and secure them by fastening screws to the cooper posts. Install add-on card 1. 2. 3. Pressing the slot cover and bend forward and backward to remove it. Insert the add-on card. Secure the add-on card with screws.
ATX Computer Case R7329 User Manual Installing Drives (CD/DVD ROM, FDD and HDD) 1. Detach the front panel from the casing by pressing the clips that on the rear side of front panel. 2. Remove the metal cover of the bay. 3. Insert the device in place; and secure with screws. Replacing the power device 1. Loosen the screws to remove the power supply. 2. Place the power supply on the power rack with the wiring end facing forward and connect it to the back of the casing. 3.
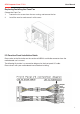
ATX Computer Case R7329 User Manual Replacing/Installing the Case Fan Change the Front Fan 1. Loosen the fan screws from the rear casing, and remove the fan. 2. Install the new fan and secure it with screws. I/O Function Panel Installation Guide Please refer to the illustration on the section of USB2.0 and Audio connector from the motherboard user’s manual. The following illustration is a connection diagram for the front panel I/O cable. Please check with your motherboard manual before installing.
ATX Computer Case R7329 User Manual Thank you for purchasing Rosewill Product. Please register your product at www.rosewill.com for complete warranty information and future support for your product.