
User manual
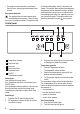
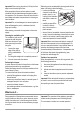
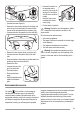

• Unscrew the lower hinge (a1).
• Remove the door closure device from the hinge and
move the pin to the other side. Re-screw the door
closure device provided within the accessory bag.
• Unscrew and move the pedal to the other side (a3).
• Remove the door closure device on the door (b1).
• Unscrew and move the bracket (b2) to the other
side.
• Re-screw the door closure device provided within the
accessory bag to the other side (b3).
• Remove the door.
• Unscrew and move the
pin to the other side.
• Re-insert the door.
• Re-screw the lower
hinge.
• Raise the appliance and
install the ventilation
grille.
a3
a2
a1
b2
b1
b3
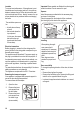
• Unscrew the handle. On
the opposite side re-
move the hole covers by
driving a 3-4 mm drift or
drill into them. Install the
handle.
Install the hole covers
provided within the ac-
cessory bag.
• Put the cabinet in position.
Warning! Reposition, level the appliance, wait for
at least four hours and then connect it to the
power socket.
Do a final check to make sure that:
• All screws are tightened.
• The edges of the doors run parallel to the side edge
of the appliance.
• The magnetic seal adheres to the cabinet.
• The door opens and closes correctly.
Warning! If the ambient temperature is cold (i.e.
in Winter), the gasket may not fit perfectly to the
cabinet. In that case, wait for the natural fitting of the
gasket.
Environmental concerns
The symbol on the product or on its packaging
indicates that this product may not be treated as
household waste. Instead it should be taken to the
appropriate collection point for the recycling of electrical
and electronic equipment. By ensuring this product is
disposed of correctly, you will help prevent potential
negative consequences for the environment and human
health, which could otherwise be caused by
inappropriate waste handling of this product. For more
detailed information about recycling of this product,
please contact your local council, your household waste
disposal service or the shop where you purchased the
product.
11