User manual Freezer RPP3230 RPP3230X
Contents Safety instructions _ _ _ _ _ _ _ _ _ _ _ _ _ _ _ _ _ _ Control panel _ _ _ _ _ _ _ _ _ _ _ _ _ _ _ _ _ _ _ _ _ First use _ _ _ _ _ _ _ _ _ _ _ _ _ _ _ _ _ _ _ _ _ _ _ Daily use _ _ _ _ _ _ _ _ _ _ _ _ _ _ _ _ _ _ _ _ _ _ _ Helpful hints and tips _ _ _ _ _ _ _ _ _ _ _ _ _ _ _ _ _ 2 4 5 5 6 Care and cleaning _ _ _ _ _ _ _ _ _ _ _ _ _ _ _ _ _ _ 6 What to do if… _ _ _ _ _ _ _ _ _ _ _ _ _ _ _ _ _ _ _ _ 7 Technical data _ _ _ _ _ _ _ _ _ _ _ _ _ _ _ _ _ _ _ _ 9 Installation _ _ _ _ _ _ _ _ _ _ _ _ _ _
Warning! Any electrical component (power cord, plug, compressor) must be replaced by a certified service agent or qualified service personnel to avoid hazard. 1. 2. • • • • Power cord must not be lengthened. Make sure that the power plug is not squashed or damaged by the back of the appliance. A squashed or damaged power plug may overheat and cause a fire. 3. Make sure that you can come to the mains plug of the appliance. 4. Do not pull the mains cable. 5.
• This product must be serviced by an authorized Service Centre, and only genuine spare parts must be used. Environment Protection This appliance does not contain gasses which could damage the ozone layer, in either its refrigerant circuit or insulation materials. The appliance shall not be discarded together with the urban refuse and rubbish. The insulation foam contains flammable gases: the appliance shall be disposed according to the applicable regulations to obtain from your local authorities.
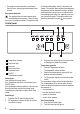
Important! This function stops automatically after approx. 52 hours. It is possible to deactivate the function at any time by pressing the Fast Freeze button. The Fast Freeze light will switch off. High temperature alarm Temperature increase in the freezer compartment (for example due to an earlier power failure or door is open) is indicated by: • Alarm light flashing. • sounding of buzzer. The buzzer can be switched off by pressing the Alarm reset button.
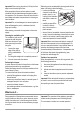
Freezing baskets The freezer baskets ensure that it is quick and easy to find the food package you want. To gain space, the baskets can be removed and the food can be put directly on the shelves. On all shelves it is possible to place food that protrude 20 mm from the front edge. This allows maximum use of the available space. Important! Do not remove the bottom basket to ensure correct air circulation.
Important! When moving the cabinet, lift it by the front edge to avoid scratching the floor. Many proprietary kitchen surface cleaners contain chemicals that can attack/damage the plastics used in this appliance. For this reason use a soft cloth rinsed in warm water and neutral soap emulsion for cleaning external surfaces. Important! Do not use detergents or abrasive paste as these will damage the paint, or stainless steel anti finger print coating.
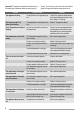
Important! The appliance operates discontinuously, so the stopping of compressor does not mean being no Problem current. That is why you must not touch the electrical parts of the appliance before breaking the circuit. Possible cause Solution The appliance is noisy. The appliance is not supported properly. Check if the appliance stands stable (all feet and wheels should be on the floor). Refer to "Levelling". The buzzer sounds. The Alarm light flashing. The temperature in the freezer is too high.
Problem Possible cause Solution The mains plug is not connected to the mains socket correctly. Connect the mains plug to the mains socket correctly. The appliance has no power. There is no voltage in the mains socket. Connect another electrical appliance to the mains socket. Check fuse. Contact a qualified electrician. Door interferes with ventilation grill. The appliance is not levelled. Refer to "Levelling". Misaligned door The appliance is not levelled. Refer to "Levelling".
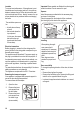
Location To ensure best performance, if the appliance is positioned below an overhanging wall unit, the minimum distance between the top of the cabinet and the wall unit must be at least 40 mm . Ideally, however, the appliance should not be positioned below overhanging wall units. The ventilation space can be: • directly above the appliance • behind and above the top cupboard. In this case, the space behind the top cupboard must be at least 50 mm deep.
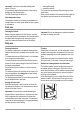
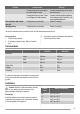
a3 a2 a1 • Unscrew the lower hinge (a1). • Remove the door closure device from the hinge and move the pin to the other side. Re-screw the door closure device provided within the accessory bag. • Unscrew and move the pedal to the other side (a3). b2 b1 b3 • Remove the door closure device on the door (b1). • Unscrew and move the bracket (b2) to the other side. • Re-screw the door closure device provided within the accessory bag to the other side (b3). • Remove the door.
www.electrolux.