ohh=RMM UON=MS=SQJMM
`çåíÉåíë `çåíÉåíë Safety ............................................................ 3 The Cooker ................................................ 4 Unpacking .......................................... 4 The accessories ................................. 4 The safety equipment ............................... 5 Non-tip device ................................... 5 The hob guard (optional accessory) 5 The door catch .................................. 6 Before the first use .........................
p~ÑÉíó p~ÑÉíó= Cooker technology is constantly improving. The way you use your new cooker may be different from the way you used your old one. Please read the whole instruction book before using your new cooker. This cooker is intended for normal domestic use. Take care of the instruction book which will be needed by the new owner if the cooker is sold or passed on to someone else. Do not hesitate to contact us with questions or viewpoints about the cooker and its use.
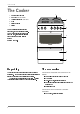
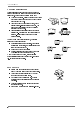
qÜÉ=`ççâÉê qÜÉ=`ççâÉê 1 2 3 4 5 6 1 Removable oven vent Hob with HEATING ZONES Control panel with CONTROLS Oven Storage drawer Plinth 2 3 To make it easier to clean behind the cooker, it has wheels at the rear. To move the cooker forwards, open the oven door, lift carefully holding the upper edge and then pull the cooker out from the wall. 4 5 6 råé~ÅâáåÖ Check that the cooker is undamaged and in perfect condition.
qÜÉ=ë~ÑÉíó=ÉèìáéãÉåí qÜÉ=ë~ÑÉíó=ÉèìáéãÉåí There should be at least 40 cm of worktops on both sides of the cooker (SEE PICTURE). Alternatively the cooker can be installed with a wall or a tall kitchen unit on one side and a worktop on the other. Child safety is further improved if the following equipment is fitted/in use: min. 40 cm min. 40 cm kçåJíáé=ÇÉîáÅÉ The non-tip device should be fitted, to prevent the cooker from tipping if subjected to an abnormal loading.
qÜÉ=ë~ÑÉíó=ÉèìáéãÉåí qÜÉ=Çççê=Å~íÅÜ The door catch makes it harder for children to open the oven door/storage drawer. The catches are already activated when the cooker is supplied new, but can be deactivated if necessary. TO DEACTIVATE THE DOOR CATCH, DO AS FOLLOWS: A B C To open the door, lift the lever at the same time as pulling the door towards you. When you want to deactivate the catch, open the door (make sure the oven is not hot).
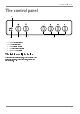
qÜÉ=ë~ÑÉíó=ÉèìáéãÉåí qÜÉ=Åçåíêçä=é~åÉä 1a °C 1b 3 2 4 1a COOKER indicator light 1b OVEN indicator light 2 OVEN function control 3 OVEN temperature control 4 HEATING ZONE controls qÜÉ=áåÇáÅ~íçê=äáÖÜí=ÄìäÄë These are neon indicator lights, which normally have a long service life. If one should fail, contact your service centre.
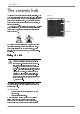
qÜÉ=ÅÉê~ãáÅ=ÜçÄ qÜÉ=ÅÉê~ãáÅ=ÜçÄ The ceramic hob has four cooking areas (hotplates). Even with the control still turned on during cooking, these areas may be seen to switch off and on at intervals, depending partly on the heat setting used. This switching can also occur with the control turned to its maximum setting, to prevent overheating. The hot-hob warning device has four lights.
qÜÉ=ÅÉê~ãáÅ=ÜçÄ _çáäáåÖ You normally start cooking with the hotplate switched to maximum heat before turning it down to a lower heat. The sound and size of the water bubbles can help you to choose the correct setting: : Simmering with tiny bubbles as in carbonated water. Suitable for cooking rice, fish and vegetables such as sugar peas and broccoli. GENTLE HEAT MEDIUM HEAT: Gently boiling with larger bubbles. Suitable for boiling most foods, such as meat, root vegetables and potatoes.
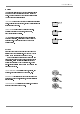
qÜÉ=ÅÉê~ãáÅ=ÜçÄ `ÜççëáåÖ=ëìáí~ÄäÉ=é~åë= Greater attention needs to be paid to the type and condition of pans used on ceramic hobs than it does with radiant hobs. Here are some points to remember: • Check the pan bases. Bases which are convex (curve outwards) will tend to spin on the hob and will not conduct heat very well. • Aluminium is a good conductor of heat, but it can leave silver-coloured stains on the hob. You can remove these stains with the hob cleaner supplied with the cooker.
qÜÉ=ÅÉê~ãáÅ=ÜçÄ `äÉ~åáåÖ=íÜÉ=ÅÉê~ãáÅ=ÜçÄ Use the scraper supplied to remove spillages immediately, while the hob is still hot, especially sugar and foods with a high sugar content (e.g. jam), melted plastics and foil, all of which can damage the hob if left. IF THE HOB IS VERY SOILED: 1 Remove soilage using the razor blade scraper (see below). 2 Use the hob cleaner supplied when the hot-hob warning lights have all gone out. Shake the bottle and apply a small quantity of cleaner directly onto the hob.
qÜÉ=ÅÉê~ãáÅ=ÜçÄ TO USE THE SCRAPER, FOLLOW THESE INSTRUCTIONS: 1 Expose the razor blade by pushing the button (on the 2 3 4 5 NO top of the scraper) forwards to “stop” (see illustration). You can check the razor blade is locked into position by pushing the blade down onto a hard surface. Make sure the razor blade is clean and not worn otherwise it might damage the hob. New razor blades can be bought from drugstores. Angle the scraper at approx. 45° and scrap away the spillage.
qÜÉ=çîÉå qÜÉ=çîÉå The oven has removable side racks for the shelves with three rungs on each side. qÜÉ=ÑìåÅíáçåë=çÑ=íÜÉ=çîÉå For all oven functions, the indicator light comes on when the oven is heating and goes out when the set temperature is reached (goes on and off as the thermostat switches in and out). To choose an oven function, turn the function control to the symbol for the desired function (see below). THE OVEN FUNCTIONS ARE: =lîÉå=äáÖÜí The oven light comes on automatically for all settings.
qÜÉ=çîÉå mê~ÅíáÅ~ä=ìëÉ Never place aluminium foil, baking trays or oven dishes directly on the bottom of the oven. Blocking heat from the bottom of the oven can damage the enamel through overheating. The oven gets hot when in use: CHILDREN NEARBY MUST BE SUPERVISED. The baking tray may warp temporarily due to temperature fluctuations, or if the food, (pizza, etc.) is unevenly distributed on its surface. The tray resumes its shape when cool.
qÜÉ=çîÉå rëáåÖ=íÜÉ=êç~ëíáåÖ=ëÉåëçê A meat thermometer should be inserted so that its tip comes to the thickest part of the meat, where the heat takes longest to reach. The entire thermometer should preferably be inside the meat, because hot air in the oven can affect its reading if the shaft is exposed. If the thermometer is inserted into fat or touches bone, it can give an unreliable temperature reading. Preheat the oven first, then put the joint in the lower part of the oven.
qÜÉ=çîÉå =içï=íÉãéÉê~íìêÉ=ÅççâáåÖI= ã~ñK=NORø`K Set the function control to and the temperature control to the required temperature (max. 125°C). The low temperature method is ideal for food which can be cooked slowly. When planning your cooking, remember that it takes longer with this method before the food is ready. Joints of beef such as topside and sirloin retain their natural juices best if roasted at 125°C.
qÜÉ=çîÉå qÜÉ=çîÉå=Çççê The oven door consists of two sections with heatreflecting glass for a lower surface temperature. The outer section, the door front, can be removed for cleaning. Take care not to damage the panes of glass. Small cracks at the edges can cause an entire pane to crack after it has been heated a few times. TO CLEAN BETWEEN THE TWO PANES: 1 2 3 4 5 6 Check that the oven is not hot and that the door catch is activated before you remove the outer section, the door front.
qÜÉ=çîÉå píçê~ÖÉ=Çê~ïÉê Empty the drawer and pull it out as far as possible. 2 Hold the handle and lift upwards gently. This frees the drawer from the catch at the back. 3 Pull the drawer out completely and lift it out. After cleaning, place the drawer wheels on the brackets (SEE PICTURE). Lift the drawer slightly as you first push it in so as to prevent the wheels from fastening in the front catch.
fåëí~ää~íáçå fåëí~ää~íáçå Work on the cooker must be carried out by a qualified electrician. The cooker is heavy. Certain edges and corners which will not normally be exposed may be sharp. USE GLOVES when moving the cooker. Before installing the cooker, you should check that its dimensions correspond to the rest of your kitchen units. Measure the height of the worktop from floor to top surface of the worktop, and the plinth depth from the wall to the front edge of the plinth (SEE PICTURE).
fåëí~ää~íáçå mçïÉê=ëìééäó=ÅçååÉÅíáçå REPAIRS AND WORK ON THE COOKER MUST BE . Work performed by unqualified persons can damage the cooker and may also lead to personal injury and/ or damage to property. CARRIED OUT BY A QUALIFIED ELECTRICIAN Cookers supplied with an electrical lead and plug should be connected to an earthed wall socket. Wattage and voltage are stated on the rating plate (see the righthand side of the cooker).
pÉêîáÅÉ pÉêîáÅÉ Repairs and work on the cooker must be carried out by a QUALIFIED ELECTRICIAN. Work performed by unqualified persons can damage the cooker, and may also lead to personal injury and/or damage to property. If your cooker is not working properly, refer to pages 23 and 24 for suggestions on how to rectify the problem. `çåëìãÉê=Å~êÉ Contact the retailer if you have any questions concerning the cooker or its use.
qÉÅÜåáÅ~ä=Ç~í~ qÉÅÜåáÅ~ä=Ç~í~ We reserve the right to alter these specifications. This appliance conforms with EC-directive 89/336/EEC and 73/23/EEC. RKK 500 Width (mm): 497 Height, when delivered (mm): 900 Depth (mm): 595 Oven volume (litres): 36 Total wattage 230V-model (W): 8915 HEATING ZONES SIZE (mm) WATTAGE (W) Rear left 145 1200 Rear right: 180 1800 Front left: 180 1800 Front right: 145 1200 : neon type OVEN LIGHT BULB: E-14 screw fitting, marked 230-240V, 15W and 300ºC.
mê~ÅíáÅ~ä=íáéë=~åÇ=~ÇîáÅÉ mê~ÅíáÅ~ä=íáéë=~åÇ=~ÇîáÅÉ Problem Cause Action needed Bread and cakes are not rising properly. Too low an oven temperature means that Check the temperature used against that the baking is rising but then sinking flat recommended in the recipe. again. Bread dough has not risen properly. Leav- Check the proving time recommended in ing the dough to prove too long can cause the recipe. the bread to turn out flat. Dough should prove in a warm, draught-free place.
mêçÄäÉãë=~åÇ=~Åíáçåë=åÉÉÇÉÇ mêçÄäÉãë=~åÇ=~Åíáçåë=åÉÉÇÉÇ Never attempt any repairs or work on the cooker which could cause injury or damage the product. If you cannot solve t problem after checking the list below, contact a service company approved by the supplier. Problem Action needed The cooker has no electrical supply Check that: • THE FUSE(S) has not gone • THE PLUG is pushed in correctly • THE RCD (if fitted) has not tripped Boiling/frying takes a long time.
ROSENLEW 2B tecknare Ab Printed on environmentally sound paper © ABS-PCC 2002-03-28